Custard, floral, fruit, Places, Recipes, Tropical

Welcoming Spring: Flowerbomb Verrine

Image

Today is the first day of Spring, and while you could hardly even tell Winter came to Southern California this year, I still anticipate the sunshine and flowers and general sense of renewal that comes with this season. I don’t make New Year’s Resolutions, nor have I ever been the type to keep them, but there’s something about Springtime that just makes me want to make everything better: my life, my health, and my overall happiness. Lately I’ve noticed that I haven’t quite been myself and things have been very… off. So while I won’t go too far into personal details here, I’ve resolved to fix that, albeit slowly, as well. Baby steps.

Image

Yesterday was my day off and since the hubby was at work, I took a nice, quiet stroll through the San Juan Capistrano Farmer’s Market, which was a mere 10 minutes from our home. While the farmer’s market itself was small, downtown SJC during the daytime is always a bustling place, filled with rich history and culture. It happens to be my favorite place to relax; there are antique shops and little markets and boutiques all without the LA prices, so if you’re ever in South Orange County, I highly recommend stopping by. I got the lovely mix of flowers in the picture above for $4 at the market. Aren’t they stunning??

Image

For a while I’ve wanted to come up with a very floral dessert, and yesterday I finally decided what I wanted to make: something with very simple components, but bursting with the flavors of Spring. I made a verrine with a Honey Panna Cotta, a Feijoa and Strawberry Rope, and a Lavender Broth, and garnished it all with some edible pansies. For the panna cotta I used local honey made from avocado blossoms: while it’s not quite as floral as say, an orange blossom honey, it’s very buttery, which combines really well with the already rich and creamy dessert. For the rope, I used very ripe feijoas and wild strawberries. Feijoas are also known as pineapple guavas; they have all the tropical notes that pineapples and guavas have, but the meat is smooth and more creamy than it is tart. The rope gives the dish a nice fruity pop when you take a bite. The lavender broth combined with the feijoa strawberry rope cut into the richness of the panna cotta really well, and make for a dish that swells with springtime goodness. Basically, I want to jar it and use it as perfume.

Image

Flowerbomb Verrine

For Honey Panna Cotta:

Makes 3 verrines

165 g heavy cream

20 g granulated sugar

20 g honey

3 g granular gelatin

15 g cold water

Bloom your gelatin in your cold water and set aside. In a small pot, combine heavy cream, sugar, and honey and bring to a simmer over medium heat. Turn off heat and stir in bloomed gelatin until completely melted. Let mixture cool a little, then carefully pour into verrines. To achieve the tilted glass look that I have in my pictures, I set my glasses into the wells of a large muffin pan, and tilted them slightly to the side while ensuring they have enough support to stay tilted when filled, then filled them just under half-way. Chill panna cottas overnight.

For Feijoa Strawberry Rope:

90 g Feijoas, ripe, trimmed and seeded

45 g strawberries, trimmed and quartered

150 g granulated sugar

2 g granular gelatin

10 g warm water

1/2 teaspoon lime juice

Bloom your gelatin in cold water, set aside. In a small pot, combine Feijoas, strawberries, and sugar, and bring to a boil. While stirring, let mixture boil until fruit has softened and broken down considerably, and sugar syrup reduces (I brought the entire mixture to 110C). Stir in your bloomed gelatin until it has melted completely, then remove from heat and stir in your lime juice. Blend the entire mixture together until smooth, then strain through a fine mesh sieve onto a lined sheet pan. Discard any pulp, and cover and chill the puree overnight. The next day, scrape puree (it should be firmer and more like a paste by now) into a piping bag fitted with a small round tip (I used Ateco #801). Keep cold.

For Lavender Broth:

1 Tablespoon dried Lavender buds

30 g sugar

230 g water

1/4 teaspoon vanilla extract

2 drops purple color (if desired)

Combine lavender buds, sugar, water, and vanilla extract in a saucepot and bring to a simmer over medium heat. Remove from heat and chill overnight. The next day, strain out buds and add color if desired. Carefully pour into verrines with chilled panna cotta, and then pipe Feijoa strawberry paste into a long rope around verrines. Garnish with edible flowers if desired.

Standard
Breakfast, Cake, fruit, Places, Recipes

Good Humor Strawberry Shortcake Doughnuts

Image

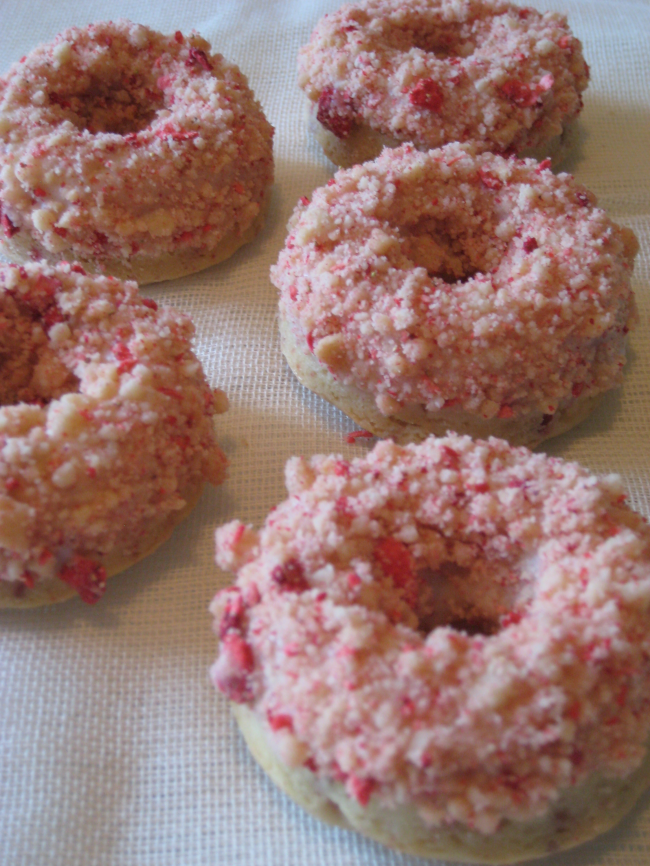
So, I’m a thief. Kinda. As in, I totally didn’t come up with this idea myself, I saw it somewhere else. But hey, they say imitation is the best form of flattery, right? When I was a kid, Good Humor’s Strawberry Shortcake ice cream bar happened to be one of my favorite ice creams growing up.

Image

Yeah, you know the one. So when I heard there was a bakery in LA (a cute one, at that) that made doughnuts resembling a favorite childhood treat, I decided to make the trip on my next day off to check it out. And it was good! It was good, BUT, Lord knows I don’t have the funds to drive down to LA every time I crave that cakey goodness. I had to figure out how to make it myself, from the comfort of my own home.

Image

Essentially what I did was find a basic cake doughnut recipe and adjusted it so I could get something closest to what I thought would do proper homage to the ice cream itself. After a few failed attempts (who knew doughnut batter could be so taxing??) I finally rendered a recipe I liked, nay, ENJOYED, and am thoroughly pleased with the results. The hubby ate two of them right after I finished taking these pictures, so I’m gonna go ahead and say he enjoyed them too!

Image

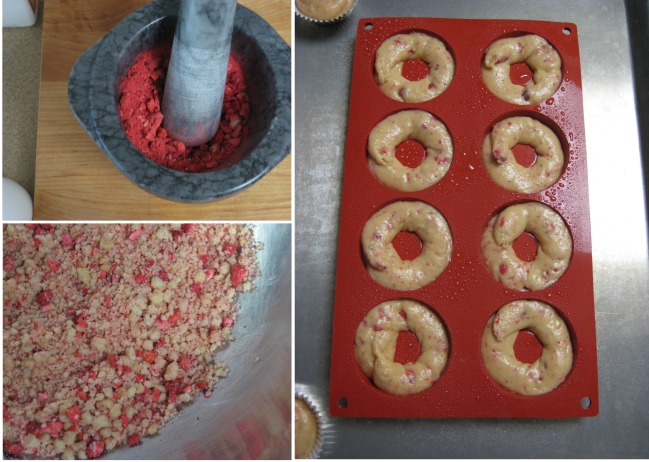
Progress pics! Crushing the freeze-dried strawberries, the finished strawberry streusel, and the batter after I piped it into my oiled pan. Since I’m not quite ready to invest in a doughnut mold, I used a silicon savarin mold that I already had at home. The results were exactly what I wanted them to be, so money saved on my side!

Image

Needless to say, I am very happy with the results and this little adventure was a very refreshing break from all the European-style desserts I make at work (tons of fluff, or as a dear friend of mine calls it, “floofsy”). Now if you’ll excuse me, I have some indulging to do!

Good Humor Strawberry Shortcake Doughnuts

makes 8 (2.5″) doughnuts

For doughnuts:

135 g All Purpose flour

5 g baking powder

1/4 teaspoon salt

110 g granulated sugar

10 g freeze-dried strawberries, crushed

108 g sour cream

1 teaspoon vanilla extract

1/4 teaspoon almond extract

50 g egg (1 large)

30 g butter, melted

Preheat your oven to 350F. In a large bowl,  whisk together your flour, baking powder, salt, and sugar until there are no lumps. Stir in your crushed freeze-dried strawberries. Make sure there are no large pieces of strawberry, as they will become chewy once baked. In another bowl, whisk together sour cream, vanilla extract, almond extract, egg, and melted butter until smooth. Pour your wet ingredients into your dry, then gently fold the two just until the batter comes together. It is very important that you not overmix the batter because there is a lot of flour, so be careful! Fill a piping bag with your batter and pipe into an oiled doughnut pan or savarin mold, filling them 2/3 full. Bake in your preheated oven for 22 minutes, or until a toothpick inserted into one of your doughnuts comes out clean. Note that my baking time may be slightly longer than yours if you didn’t use a silicon mold, so feel free to peek in the oven as it gets closer to that 20 minute mark! Let doughnuts cool completely before removing them from your pan.

For Strawberry Streusel:

18 g granulated sugar

15 g brown sugar

108 g butter, cold, diced in 1/2″ cubes

148 g All Purpose flour

13 g freeze-dried strawberries, crushed finely

Preheat your oven to 340F. In a bowl of a stand mixer fitted with a paddle attachment, combine granulated sugar with brown sugar and cold diced butter. Paddle until cubes of butter have broken up, then slowly add your flour. Mix until all the ingredients start to come together and form pea-sized lumps. Dump streusel onto a sheet pan lined with a silicon mat, spread out evenly onto sheet pan, and bake in your preheated oven for 10 minutes, then stir around with a spatula and bake another 10 minutes or until streusel is an even golden brown color. Let cool completely, then pour into a large bowl and toss with crushed freeze-dried strawberries. Use your fingers to toss around and break apart any large lumps.

For Doughnut Icing:

124 g powdered sugar

15 g water

1 g almond extract

Stir together all 3 ingredients until icing is smooth and fluid. This icing is basically just a glue that helps the strawberry streusel to adhere to the doughnut, so no need to double glaze or anything of that sort (unless you like your doughnuts super sweet, then feel free!). Take 1 doughnut and dunk the top half into your icing, let any excess drip off or scrape excess icing off along the side of your bowl, then quickly dunk it into your streusel. Repeat this process with each of your doughnuts, and let icing set before digging in. Have fun!

Standard
Cake, Chocolate, fruit, Petit Four, Recipes

Raspberry Dark Chocolate Cakelettes, Instagram, and a Happy (Early) Valentine’s!

Image

Valentine’s Day is just around the corner and although I typically am not big on “Hallmark Holidays”, I still love to indulge a bit in what is supposed to be our nation’s day of love. After purchasing a copy of Paris Patisseries and rifling through page after gorgeous page, I was inspired by a picture of Pain de Sucre’s raspberry heart cakes and knew I wanted to make something similar of my own. But of course, it’s not quite Valentine’s Day without a bit of chocolate, so I made these not only raspberry flavored, but also added in some very dark (72%) chocolate.

Image

I immediately went to my specialty foods store and bought this adorable heart fleximold. Isn’t it cute?? And as a baker, there is no better feeling than having a new, fresh fleximold. After working in a kitchen full of old, beat-up molds, a new one is the stuff of dreams.

Image

Also, I know that these look very similar to Red Velvet cakes, but I can assure you that they’re not! In fact, if you love chocolate, they’re even better than Red Velvet! These cakelettes have a very tender and dense crumb, and a very smooth mouthfeel. The chocolate lends them an almost creamy richness as well. The raspberry flavor comes from straining raspberry preserves through a fine mesh sieve, and using what looks like an intensely-flavored thick raspberry syrup that is left after straining. This step is a bit tedious, but is certainly worth the trouble. I highly recommend these if you’re looking for something to make for your Boo on that special day *wink wink*

Before I post the recipe, I wanted to let you guys know that after high demand, I’ve started an Instagram! So if you’re interested in seeing some of the things I make at work or taking a peek at my life outside this blog, feel free to follow me at #lainey_made! I promise you I won’t post anything lame or inappropro!

Raspberry Dark Chocolate Truffle Cake

makes 12 (2.5″) cakelettes

168 g strained raspberry preserves (I strained about 2/3 of a 16oz container, but what you get leftover depends on how thick the preserves are)

186 g 72% dark chocolate, chopped

200 g whole eggs (4 large)

80 g granulated sugar

100 g cake flour

5 g baking powder

4 g salt

1/2 tsp. red gel color

After straining raspberry preserves, discard pulp and seeds, and use only the syrup left over.

Preheat oven to 330F. Using a double boiler over low heat, melt chocolate and after completely melted, gently stir in raspberry syrup until emulsified. Turn off heat but keep bowl over the double boiler to keep it warm.

In a bowl of a stand mixer, whip eggs and sugar until eggs are very pale and reach ribbon stage. While eggs are whipping, sift together cake flour, baking powder, and salt.

When eggs are done whipping, gently fold in chocolate/raspberry mixture until almost fully incorporated. Fold in flour mixture, then fold in red gel color. Eggs will deflate a bit while folding, so don’t worry too much if it loses some volume.

Distribute batter evenly between molds, and bake 18-20 minutes. Cakes are done when you can start seeing tiny cracks on top. Let cool completely in molds and then enjoy eating them with someone you love!

Standard
Breakfast, Crafts, DIY, Fashion, Knitting, lunch, Savoury

Ballet Wrap Sweater & Thanksgiving Leftovers

Image

Happy Holidays everyone! I hope you’re all enjoying this cold weather! Now that I’m back in knitting mode, I’ve been caught up in my latest sweater, this mini ballet-style sweater/cardigan/what-have-you. While it’s definitely not ideal to wear only THIS sweater in the cold, I think the fit and size is just perfect to wear over a dress or tank top (while you’re indoors!) The pattern is free on Ravelry and is absolutely adorable, if I do say so myself. While it wasn’t nearly as quick a knit as my last sweater (it’s those damn tiny stitches!), I would still say it was fairly quick for any article of clothing.

Image

In terms of yardage, this particular sweater was perfect because I just used some yarn that I had left over from a project I had done ages ago. I love the ivory tone and that it has iridescent threads running through it; it really makes it more feminine and just a touch more festive for the holidays. I decided to sew in the pink satin ribbon instead of knitting the straps as well, just to keep with that ballet motif.

In addition to knitting, I’ve also been doing quite a bit of cooking lately; after roasting my turkey for Thanksgiving (which was graciously provided to us by my workplace), I decided to turn some of the leftover meat into Turkey and roasted garlic Rillettes!

Image

I don’t think that I’ve mentioned it here yet, but a few weeks ago I decided to turn down my job offer in LA. I know, sad story. But at this point in my life I feel like I need to focus more on my personal life rather than JUST my professional one, as I have in the past. I mean,  I just got married, I’m still really young, and I would love to enjoy all this time that I have while I still have it. Besides, if I’m talented enough, there will always be another opportunity for me in the future that is just as good as that one, or maybe even better. As always, patience is key.

Anyway, back to the rillettes! Rillettes happen to be one of my favorite forms of charcuterie; give me any kind of rillettes, some crusty bread, a few cornichons, and some stone ground mustard and I’m pretty much the happiest girl in the world. While this isn’t your traditional rillette (notice it’s missing the layer of fat on top for preservation), this was just my way of using up most of the leftover turkey we had in our fridge. Apparently a 14lb turkey was too much for two people. Who’da thunk? No recipe here, but basically what I did was I took the meat off of about half of our roasted turkey and put it in a big pot with some melted butter, a ton of roasted garlic (which I conveniently roasted alongside my turkey), sage leaves, fresh thyme, peppercorns, dry white wine, and red wine vinegar. I let the mixture simmer in the pot over very low heat for at least 2 hours (with the lid on), until meat was incredibly tender and the liquid was almost completely reduced. Once the mixture had cooled slightly, I removed the peppercorns and herb stems (the garlic had completely melted by then) and put the meat and juices in a food processor and blended it on low until it reached the consistency that I wanted: spreadable, but not pasty. I packed it into a couple of ramekins, and refrigerated it until I was ready to dig in (:

Standard
Crafts, DIY, Fashion, Knitting, Sewing

Twinkle Knits and My First Sweater!

Image

Now that the weather in SoCal is starting to cool down, I thought it would be a great time to break out the needles! I absolutely refuse to knit when it’s warm out. Does that make me a bad knitter? I just can’t stand having the yarn weave through my fingers if I think my palms are about to get sweaty; it changes the texture of the yarn, I swear! I also have a strange dislike for complex knitting patterns… I find them to be intimidating. BUT after seeing the pattern for this sweater from Twinkle’s Big City Knits, I knew I was up for the challenge.

Image

Because it’s been a few months since I’ve knit anything, I also decided to start small and knit this cute little headband first, just so I can brush up on some simple techniques. I found the pattern here, and adjusted it a bit to fit the needles and yarn I had on hand. I’d have to say that while it does take off a few years (it makes me look waaaayy younger than I should), it’s just so darn adorable that I couldn’t resist!

Image

Anyway, back to the sweater! I have been coveting that book for quite some time now (it came out in 2007!), but since I have been a bit hesitant to buy any knitting book (remember, patterns scare me?), once I saw that they had a free pattern of one of their creations online, I hopped to it! AND, guess what? It actually wasn’t so bad!

Image

While I DID have to read over the pattern about a thousand times before I really understood everything, I think it was worth it to me to get out of my comfort zone for this one. I learned a few techniques that I’ve never done before, like bobbles and shaping, and in the end it turned out to be super cute, comfortable, and amazingly warm. The pattern can be found here (Canadian Living, not what you were expecting, right?) and I highly recommend it for a first-time-garment-knitter.

Image

Happy Knitting!

Standard
Bread, Custard, Dinner, lunch, Recipes, Savoury

New Season, New Horizons, and (Adoreable!) Stuffed Mini Pumpkins

Image

So I know it’s been quite some time since I’ve posted anything here, but I swear I have a good reason for that! For those of you who haven’t heard yet, I got a new job! Yayy!! Soon I will be a Pastry Chef de Partie for a new restaurant in Downtown LA. A lot of my time lately has been dedicated towards getting ready for that job and leaving my old one behind (sigh…) but I’m really eager to put all of my energy towards this new place and just grow as much as possible. Ever since I left LA county for the OC, I’ve always known I wanted to go back, AND for those of you who know me personally, you’d know that I happen to be named after the City of Angels, but that’s another story for another time! Basically what I’m saying is that it’s like, my DESTINY, haha.

IMG_6893

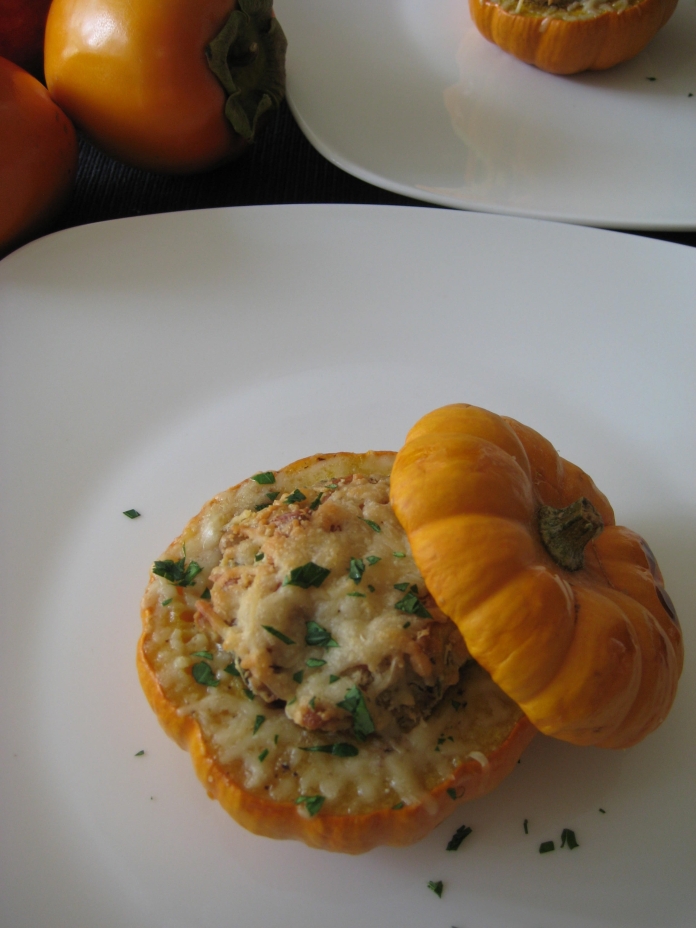
So as you can see, things have been kind of hectic lately. But let’s forget about all of that for a second! It is now Autumn, and while it doesn’t quite show here in SoCal (it was 83F today!!) just seeing all the new fall produce at the market gets me all warm and fuzzy inside and reminds me that the holidays are coming our way. Today for lunch I roasted some mini pumpkins and stuffed them with a savoury bread pudding of sorts, and then topped them with some grated parm. Just thinking about it now suddenly puts me in Thanksgiving mode. I happen to love roasted pumpkin, whether it be for a sweet or a savoury application.

IMG_6895

No recipe here just because I only made 2 portions and it was such a small amount that I kind of winged it, but basically what I did was I mixed together 1 egg yolk with a scant half a cup of heavy cream, then I diced 1 slice of potato bread and tossed it in the custard with some fresh rosemary, sage, and thyme, salt, pepper, and chopped walnuts. I cut the tops off of each mini pumpkin and scooped out all the seeds, then placed them on a lined sheet pan and drizzled them with olive oil and gave a little sprinkle of salt and pepper (I roasted the tops of the pumpkins too, so don’t leave those out of the picture!!). I then filled each pumpkin with the bread pudding mixture, and baked them at 350F for 45 minutes. Once the pumpkins were fork tender, I topped each of them with a good amount of grated Parmesan cheese, and then let them bake for another 6 minutes until the cheese was nice and melted and just barely golden brown.

I’m definitely keeping this recipe in mind for when I can start throwing my own Thanksgiving dinners, especially as a great option for vegetarian friends. As always, thanks to all of my readers for keeping up with me even though I sometimes can barely keep up with this blog! Happy eating!

Standard
Breakfast, Cake, Custard, fruit, lunch, Recipes, Savoury

[Savory] Goat Cheese Cheesecake with Balsamic Figs

Image

I realize that it’s been quite some time since I’ve posted about something that isn’t a dessert or some kind of sweet treat, so today I’m happy to share something savory with you all! Yesterday I made a goat cheese cheesecake, and topped it off with figs tossed in a honey-balsamic reduction. One of my favorite restaurants in Orange County plays with the sweet side of goat cheese and pairs it with almonds and roasted peaches on top of their pain perdue, so this is sort of inspired by their lovely dessert.

Image

Figs marinating in the honey-balsamic reduction. Because Summer is coming to an end, right now is a great time to get your fig fix on. I love that they just sop up that reduction and make the perfect balance of sweet and tart. They also happen to look like shiny little jewels on top of the cheesecake, and you know how much I like to bejewel my food!

Image

Like most cheesecakes, this one bakes at a really low temperature for a long time, so I would suggest making it a day ahead and letting it sit in your fridge overnight to firm up before you dig in. Apart from using goat cheese, I think what really makes this cheesecake truly savory is the almond crust: it has a good amount of fresh cracked black pepper and grated shallots, so if you happen to like onions you’ll probably fall in love with this (just like I did!). Of all the savory recipes I’ve posted here, I would without a doubt say that this one is by far my favorite. The cheesecake is just so rich and creamy, and when paired with the tartness of the figs and balsamic vinegar, it just harmonizes on your palette.

[Savory] Goat Cheese Cheesecake

makes 1 (8″) cake

for savory crust:

29 g unsalted butter

150 g almond flour

1 teaspoon cracked black pepper

1 Tablespoon grated shallots

1/4 teaspoon kosher salt

For crust: melt butter and toss together with almond flour, black pepper, shallots, and salt until combined. Press into a greased 8″ tart or cake pan.

for cheesecake filling:

225 g cream cheese, at room temperature

163 g goat cheese, at room temperature

60 g granulated sugar

67 g egg yolks

50 g whole eggs

80 g sour cream

1/4 teaspoon salt

For filling: preheat oven to 220F. In the bowl of a stand mixer fitted with a paddle attachment, cream together your cream cheese, goat cheese, and sugar until there are no lumps. With the mixer running, slowly add in your eggs and egg yolks, scraping the sides of the bowl with a rubber spatula from time to time. Add your sour cream and salt, and paddle until filling is completely smooth with no lumps. Pour filling over crust and tap pan on your counter to flatten out the top. Bake for about 1 1/2 hours, turning cheesecake halfway through. Cheesecake is fully baked when a toothpick inserted in the center comes out clean. Let cool down until room temperature, then cover and chill overnight before removing from pan.

for honey-balsamic reduction:

72 g balsamic vinegar

40 g grade A honey

257 g black mission figs, trimmed and cut in half

For reduction: In a small saucepot, combine balsamic vinegar and honey, and bring to a simmer over medium-low heat. Stir frequently, until liquid has reduced by half in volume. Let cool to room temperature, then toss figs in reduction and let marinate for 10 minutes. Reduction will thicken as it cools down. Top your cheesecake with marinated figs, and dig in!

Standard
Cake, Wedding

Square Cakes, a.k.a. My Fickle Adversary In the Kitchen (This Week…)

Image

In the last week and a half I’ve made 3 square wedding cakes at work, and let me just say, they can be a pain in the butt. Don’t get me wrong, I love decorating cakes regardless of the shape or size, but square cakes have so many more obstacles than your ordinary round cake!

Image

For instance, corners! Do you know how hard it is to cover a sharp, pointy corner with something as soft as fondant? Those 4 corners are basically 4 chances for your fondant to tear. And even if you aren’t using fondant and just covering it in buttercream, it’s hard enough just to make it look like it has a sharp, clean edge.

Image

This was another cake I made this week. They wanted it under a canopy hanging from the ceiling! The ceiling!! I know that has nothing to do with the cake being square, but I just wanted to point out how crazy wedding trends are getting these days, haha.

Image

I had so much trouble covering that bottom tier with fondant that I had to do it 3 (3!!!) times before I got it right, without any tearing. It was just really big and it turns out I have tiny arms and/or tiny hands. Who knew? Anyway, in the end, as long as the finished product looks amazing then I know it’s all worth the strain and stress that it was. So far I haven’t had any real disasters decorating (that were my fault, at least), so I’m grateful for that and for all the opportunities I have to just MAKE these things from start to finish and get some good practice in. These are just two of the many cakes that I have done (and will do in the future), and I don’t think they look too terrible! Practice makes perfect, right?

Also, just in case you haven’t noticed, Knitterbakerpateachouxmaker has a new look! Since the ol’ bloggy is almost 2 years old, I decided it’s time to change things up a bit and give it a more simple, minimal look so that I can place more emphasis on the pictures I upload rather than any background images and so forth. Whaddaya think?

Standard
Cake, Chocolate, Custard, fruit, Home

Happy Birthday (To Me)!

Image

Another year, another birthday cake made by yours truly. Little Lainey is finally 23! Those of you who know me know that I’m not really big on celebrations (for myself, at least), and that what I really like to do on my birthday is use it as a time for reflecting on some of the things I’ve accomplished and mistakes that I’ve made within the last year and within my lifetime; I think for someone as young as myself, there are actually quite a bit of each!

Image

Because I have to work today, I spent the last couple of days by having dinner with my family, and spending an awesome relaxing day with the hubby. I also went to the beach for a couple of hours to do some of that reflecting I was talking about.

Image

This cake was kind of a last minute decision, so no recipes for this post (sorry!). For anyone who’s interested, though, it has layers of an almond olive oil sponge cake, dark chocolate, fleur de sel, and olive oil ganache, and a citrus cream. I wasn’t 100% in love with these recipes (maybe more like 85-90%) which is also why I wanted to wait on posting them till I get it right. The overall taste was good though, regardless (:

Anyway, in regards to the things that I’ve accomplished thus far in this short life, according to my husband I’m doing pretty well for someone my age, so I think I’ll take his word for it (:

Standard
Breakfast, Custard, Petit Four, Recipes

Chai Latte Eclairs

Image

After going through a rough week and a nasty cold, there was nothing I wanted to do more on my day off than just spend it relaxing by myself, watching movie after movie on Netflix while sipping on a hot latte. Yes, I am aware that dairy is bad for a cold, but it’s soothing, okay?! Plus at this point I’m almost all the way through it, and it was time for a little indulgence.

Image

There’s a little outdoor cafe by the train station here that I absolutely adore, and they happen to make excellent chai lattes. I got to spend my morning chilling on their patio, surrounded by greenery and perfect SoCal weather, all while grubbing on some yummy Greek food and treating myself to a latte (plus or minus some coughing or sneezing here and there, but I choose to forget those parts!). Despite being sick, I also decided to bake on my day off, so why not make an homage to this drink that I wholeheartedly adore?

Image

A big ol’ bowl of chai pastry cream. I added hints of cinnamon and vanilla, so while the cream itself is cold, the flavor holds a lot of warmth.

Image

I topped each eclair with a creamy cinnamon icing, and I love that you can see the little flecks of cinnamon floating around there. I kept the decor to a minimum on these guys, because sometimes patience has no place in this kitchen! I made the pastry cream first, then as I was making the eclairs I had my cream chilling in the fridge so that by the time the eclairs were baked, the cream would be cold enough to pipe. These were little 3-inch eclairs, but feel free to make them as big (or as small!) as you desire.

The pate a choux recipe I used wasn’t my own, but can be found here. The only thing I did differently was I baked my eclairs at 325F instead of 375F, and increased the baking time. Enjoy!

Chai Latte Pastry Cream

fills 32 (3-inch) eclairs

276 g milk

203 g heavy cream

6 g loose-leaf chai tea (or 3 tea bags)

2 cinnamon sticks

100 g whole eggs (2 large eggs)

24 g cornstarch

10 g brown sugar

70 g granulated sugar

55 g butter, cold, cut into small cubes

3 g vanilla extract

Combine your milk, cream, chai leaves, and cinnamon sticks in a medium-sized saucepot and bring to a simmer over medium-low heat. Remove from heat and let chai and cinnamon sticks steep in cream for at least 10 minutes. Strain tea and cinnamon sticks from cream mixture, then return cream to saucepot and warm up again, just to a scald. In a small bowl, whisk together eggs, cornstarch, brown sugar, and granulated sugar just until there are no more lumps. Temper egg mixture into hot cream, then cook over medium-low heat, stirring constantly with a rubber spatula, until cream thickens to the consistency of pudding. Strain cream through a fine mesh sieve into a clean bowl set over an ice bath. While cream is still hot, stir in your butter and vanilla extract. Chill completely before filling eclairs.

Cinnamon Icing

150 g powdered sugar

60 g heavy cream

scant 1/8th tsp. ground cinnamon

Sift powdered sugar to remove lumps, then whisk together with heavy cream and cinnamon until smooth. Mixture will be really thick. Pipe icing over the tops of eclairs after they are filled.

Standard