Breakfast, Cake, fruit, Places, Recipes

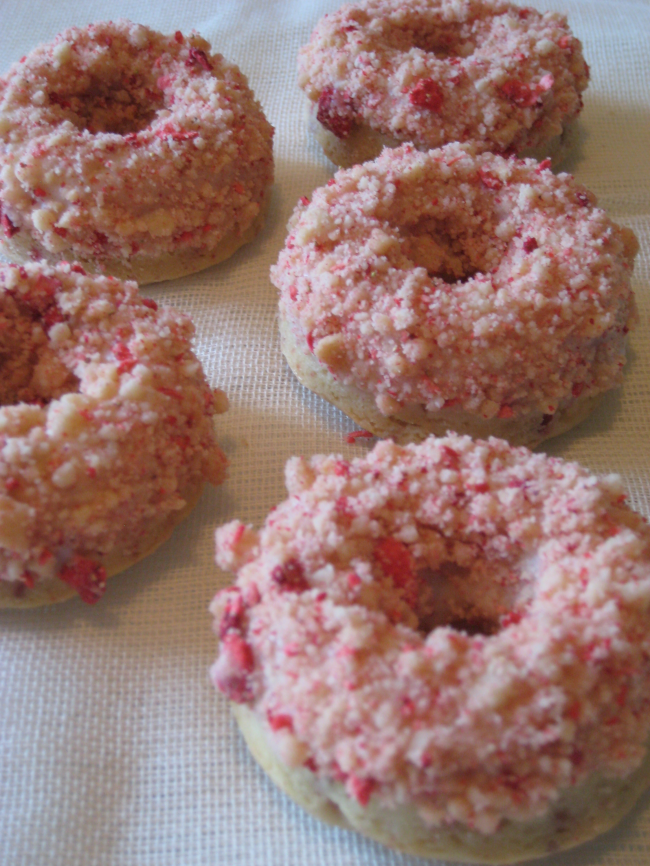
Good Humor Strawberry Shortcake Doughnuts

Image

So, I’m a thief. Kinda. As in, I totally didn’t come up with this idea myself, I saw it somewhere else. But hey, they say imitation is the best form of flattery, right? When I was a kid, Good Humor’s Strawberry Shortcake ice cream bar happened to be one of my favorite ice creams growing up.

Image

Yeah, you know the one. So when I heard there was a bakery in LA (a cute one, at that) that made doughnuts resembling a favorite childhood treat, I decided to make the trip on my next day off to check it out. And it was good! It was good, BUT, Lord knows I don’t have the funds to drive down to LA every time I crave that cakey goodness. I had to figure out how to make it myself, from the comfort of my own home.

Image

Essentially what I did was find a basic cake doughnut recipe and adjusted it so I could get something closest to what I thought would do proper homage to the ice cream itself. After a few failed attempts (who knew doughnut batter could be so taxing??) I finally rendered a recipe I liked, nay, ENJOYED, and am thoroughly pleased with the results. The hubby ate two of them right after I finished taking these pictures, so I’m gonna go ahead and say he enjoyed them too!

Image

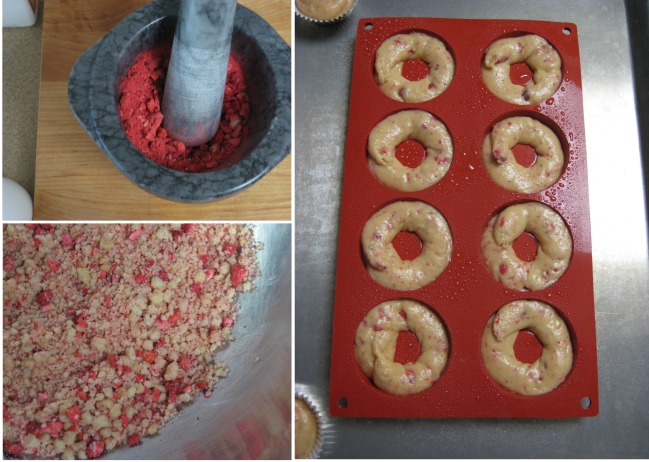
Progress pics! Crushing the freeze-dried strawberries, the finished strawberry streusel, and the batter after I piped it into my oiled pan. Since I’m not quite ready to invest in a doughnut mold, I used a silicon savarin mold that I already had at home. The results were exactly what I wanted them to be, so money saved on my side!

Image

Needless to say, I am very happy with the results and this little adventure was a very refreshing break from all the European-style desserts I make at work (tons of fluff, or as a dear friend of mine calls it, “floofsy”). Now if you’ll excuse me, I have some indulging to do!

Good Humor Strawberry Shortcake Doughnuts

makes 8 (2.5″) doughnuts

For doughnuts:

135 g All Purpose flour

5 g baking powder

1/4 teaspoon salt

110 g granulated sugar

10 g freeze-dried strawberries, crushed

108 g sour cream

1 teaspoon vanilla extract

1/4 teaspoon almond extract

50 g egg (1 large)

30 g butter, melted

Preheat your oven to 350F. In a large bowl,  whisk together your flour, baking powder, salt, and sugar until there are no lumps. Stir in your crushed freeze-dried strawberries. Make sure there are no large pieces of strawberry, as they will become chewy once baked. In another bowl, whisk together sour cream, vanilla extract, almond extract, egg, and melted butter until smooth. Pour your wet ingredients into your dry, then gently fold the two just until the batter comes together. It is very important that you not overmix the batter because there is a lot of flour, so be careful! Fill a piping bag with your batter and pipe into an oiled doughnut pan or savarin mold, filling them 2/3 full. Bake in your preheated oven for 22 minutes, or until a toothpick inserted into one of your doughnuts comes out clean. Note that my baking time may be slightly longer than yours if you didn’t use a silicon mold, so feel free to peek in the oven as it gets closer to that 20 minute mark! Let doughnuts cool completely before removing them from your pan.

For Strawberry Streusel:

18 g granulated sugar

15 g brown sugar

108 g butter, cold, diced in 1/2″ cubes

148 g All Purpose flour

13 g freeze-dried strawberries, crushed finely

Preheat your oven to 340F. In a bowl of a stand mixer fitted with a paddle attachment, combine granulated sugar with brown sugar and cold diced butter. Paddle until cubes of butter have broken up, then slowly add your flour. Mix until all the ingredients start to come together and form pea-sized lumps. Dump streusel onto a sheet pan lined with a silicon mat, spread out evenly onto sheet pan, and bake in your preheated oven for 10 minutes, then stir around with a spatula and bake another 10 minutes or until streusel is an even golden brown color. Let cool completely, then pour into a large bowl and toss with crushed freeze-dried strawberries. Use your fingers to toss around and break apart any large lumps.

For Doughnut Icing:

124 g powdered sugar

15 g water

1 g almond extract

Stir together all 3 ingredients until icing is smooth and fluid. This icing is basically just a glue that helps the strawberry streusel to adhere to the doughnut, so no need to double glaze or anything of that sort (unless you like your doughnuts super sweet, then feel free!). Take 1 doughnut and dunk the top half into your icing, let any excess drip off or scrape excess icing off along the side of your bowl, then quickly dunk it into your streusel. Repeat this process with each of your doughnuts, and let icing set before digging in. Have fun!
Standard
Breakfast, Crafts, DIY, Fashion, Knitting, lunch, Savoury

Ballet Wrap Sweater & Thanksgiving Leftovers

Image

Happy Holidays everyone! I hope you’re all enjoying this cold weather! Now that I’m back in knitting mode, I’ve been caught up in my latest sweater, this mini ballet-style sweater/cardigan/what-have-you. While it’s definitely not ideal to wear only THIS sweater in the cold, I think the fit and size is just perfect to wear over a dress or tank top (while you’re indoors!) The pattern is free on Ravelry and is absolutely adorable, if I do say so myself. While it wasn’t nearly as quick a knit as my last sweater (it’s those damn tiny stitches!), I would still say it was fairly quick for any article of clothing.

Image

In terms of yardage, this particular sweater was perfect because I just used some yarn that I had left over from a project I had done ages ago. I love the ivory tone and that it has iridescent threads running through it; it really makes it more feminine and just a touch more festive for the holidays. I decided to sew in the pink satin ribbon instead of knitting the straps as well, just to keep with that ballet motif.

In addition to knitting, I’ve also been doing quite a bit of cooking lately; after roasting my turkey for Thanksgiving (which was graciously provided to us by my workplace), I decided to turn some of the leftover meat into Turkey and roasted garlic Rillettes!

Image

I don’t think that I’ve mentioned it here yet, but a few weeks ago I decided to turn down my job offer in LA. I know, sad story. But at this point in my life I feel like I need to focus more on my personal life rather than JUST my professional one, as I have in the past. I mean,  I just got married, I’m still really young, and I would love to enjoy all this time that I have while I still have it. Besides, if I’m talented enough, there will always be another opportunity for me in the future that is just as good as that one, or maybe even better. As always, patience is key.

Anyway, back to the rillettes! Rillettes happen to be one of my favorite forms of charcuterie; give me any kind of rillettes, some crusty bread, a few cornichons, and some stone ground mustard and I’m pretty much the happiest girl in the world. While this isn’t your traditional rillette (notice it’s missing the layer of fat on top for preservation), this was just my way of using up most of the leftover turkey we had in our fridge. Apparently a 14lb turkey was too much for two people. Who’da thunk? No recipe here, but basically what I did was I took the meat off of about half of our roasted turkey and put it in a big pot with some melted butter, a ton of roasted garlic (which I conveniently roasted alongside my turkey), sage leaves, fresh thyme, peppercorns, dry white wine, and red wine vinegar. I let the mixture simmer in the pot over very low heat for at least 2 hours (with the lid on), until meat was incredibly tender and the liquid was almost completely reduced. Once the mixture had cooled slightly, I removed the peppercorns and herb stems (the garlic had completely melted by then) and put the meat and juices in a food processor and blended it on low until it reached the consistency that I wanted: spreadable, but not pasty. I packed it into a couple of ramekins, and refrigerated it until I was ready to dig in (:

Standard
Breakfast, Cake, Custard, fruit, lunch, Recipes, Savoury

[Savory] Goat Cheese Cheesecake with Balsamic Figs

Image

I realize that it’s been quite some time since I’ve posted about something that isn’t a dessert or some kind of sweet treat, so today I’m happy to share something savory with you all! Yesterday I made a goat cheese cheesecake, and topped it off with figs tossed in a honey-balsamic reduction. One of my favorite restaurants in Orange County plays with the sweet side of goat cheese and pairs it with almonds and roasted peaches on top of their pain perdue, so this is sort of inspired by their lovely dessert.

Image

Figs marinating in the honey-balsamic reduction. Because Summer is coming to an end, right now is a great time to get your fig fix on. I love that they just sop up that reduction and make the perfect balance of sweet and tart. They also happen to look like shiny little jewels on top of the cheesecake, and you know how much I like to bejewel my food!

Image

Like most cheesecakes, this one bakes at a really low temperature for a long time, so I would suggest making it a day ahead and letting it sit in your fridge overnight to firm up before you dig in. Apart from using goat cheese, I think what really makes this cheesecake truly savory is the almond crust: it has a good amount of fresh cracked black pepper and grated shallots, so if you happen to like onions you’ll probably fall in love with this (just like I did!). Of all the savory recipes I’ve posted here, I would without a doubt say that this one is by far my favorite. The cheesecake is just so rich and creamy, and when paired with the tartness of the figs and balsamic vinegar, it just harmonizes on your palette.

[Savory] Goat Cheese Cheesecake

makes 1 (8″) cake

for savory crust:

29 g unsalted butter

150 g almond flour

1 teaspoon cracked black pepper

1 Tablespoon grated shallots

1/4 teaspoon kosher salt

For crust: melt butter and toss together with almond flour, black pepper, shallots, and salt until combined. Press into a greased 8″ tart or cake pan.

for cheesecake filling:

225 g cream cheese, at room temperature

163 g goat cheese, at room temperature

60 g granulated sugar

67 g egg yolks

50 g whole eggs

80 g sour cream

1/4 teaspoon salt

For filling: preheat oven to 220F. In the bowl of a stand mixer fitted with a paddle attachment, cream together your cream cheese, goat cheese, and sugar until there are no lumps. With the mixer running, slowly add in your eggs and egg yolks, scraping the sides of the bowl with a rubber spatula from time to time. Add your sour cream and salt, and paddle until filling is completely smooth with no lumps. Pour filling over crust and tap pan on your counter to flatten out the top. Bake for about 1 1/2 hours, turning cheesecake halfway through. Cheesecake is fully baked when a toothpick inserted in the center comes out clean. Let cool down until room temperature, then cover and chill overnight before removing from pan.

for honey-balsamic reduction:

72 g balsamic vinegar

40 g grade A honey

257 g black mission figs, trimmed and cut in half

For reduction: In a small saucepot, combine balsamic vinegar and honey, and bring to a simmer over medium-low heat. Stir frequently, until liquid has reduced by half in volume. Let cool to room temperature, then toss figs in reduction and let marinate for 10 minutes. Reduction will thicken as it cools down. Top your cheesecake with marinated figs, and dig in!

Standard
Breakfast, Custard, Petit Four, Recipes

Chai Latte Eclairs

Image

After going through a rough week and a nasty cold, there was nothing I wanted to do more on my day off than just spend it relaxing by myself, watching movie after movie on Netflix while sipping on a hot latte. Yes, I am aware that dairy is bad for a cold, but it’s soothing, okay?! Plus at this point I’m almost all the way through it, and it was time for a little indulgence.

Image

There’s a little outdoor cafe by the train station here that I absolutely adore, and they happen to make excellent chai lattes. I got to spend my morning chilling on their patio, surrounded by greenery and perfect SoCal weather, all while grubbing on some yummy Greek food and treating myself to a latte (plus or minus some coughing or sneezing here and there, but I choose to forget those parts!). Despite being sick, I also decided to bake on my day off, so why not make an homage to this drink that I wholeheartedly adore?

Image

A big ol’ bowl of chai pastry cream. I added hints of cinnamon and vanilla, so while the cream itself is cold, the flavor holds a lot of warmth.

Image

I topped each eclair with a creamy cinnamon icing, and I love that you can see the little flecks of cinnamon floating around there. I kept the decor to a minimum on these guys, because sometimes patience has no place in this kitchen! I made the pastry cream first, then as I was making the eclairs I had my cream chilling in the fridge so that by the time the eclairs were baked, the cream would be cold enough to pipe. These were little 3-inch eclairs, but feel free to make them as big (or as small!) as you desire.

The pate a choux recipe I used wasn’t my own, but can be found here. The only thing I did differently was I baked my eclairs at 325F instead of 375F, and increased the baking time. Enjoy!

Chai Latte Pastry Cream

fills 32 (3-inch) eclairs

276 g milk

203 g heavy cream

6 g loose-leaf chai tea (or 3 tea bags)

2 cinnamon sticks

100 g whole eggs (2 large eggs)

24 g cornstarch

10 g brown sugar

70 g granulated sugar

55 g butter, cold, cut into small cubes

3 g vanilla extract

Combine your milk, cream, chai leaves, and cinnamon sticks in a medium-sized saucepot and bring to a simmer over medium-low heat. Remove from heat and let chai and cinnamon sticks steep in cream for at least 10 minutes. Strain tea and cinnamon sticks from cream mixture, then return cream to saucepot and warm up again, just to a scald. In a small bowl, whisk together eggs, cornstarch, brown sugar, and granulated sugar just until there are no more lumps. Temper egg mixture into hot cream, then cook over medium-low heat, stirring constantly with a rubber spatula, until cream thickens to the consistency of pudding. Strain cream through a fine mesh sieve into a clean bowl set over an ice bath. While cream is still hot, stir in your butter and vanilla extract. Chill completely before filling eclairs.

Cinnamon Icing

150 g powdered sugar

60 g heavy cream

scant 1/8th tsp. ground cinnamon

Sift powdered sugar to remove lumps, then whisk together with heavy cream and cinnamon until smooth. Mixture will be really thick. Pipe icing over the tops of eclairs after they are filled.

Standard
Bread, Breakfast, Cake, fruit, lunch, Recipes, Vegan

Chia Olive Oil Muffins with Caramelized Peaches [Vegan]

Image

In the world of all the “superfoods” out there, chia seeds seem to be the next big thing. While I’m not one for fads, I can’t say I wasn’t intrigued; the promise of more energy, lower cholesterol, aiding digestion, and a multitude of other health benefits drew me in. I bought a bag at Whole Foods and tried it for a few days, adding a spoonful or so to every meal.

Image

The seeds themselves are, well, pretty tasteless. Think in terms of poppy seeds; they add a nice crunch but not much else in the flavor department. And as for using it as an energy booster, well anything I could use to boost my energy can easily be trumped by the amount of hours I spend at work, leaving me tired at the end of any day. What I DO like about them is their amazing ability to absorb water; chia seeds can absorb 9 times their weight in water, leaving a gelatinous by-product that could easily replace eggs as a binder in baked goods. The moment I heard this I knew it was time to hit the kitchen.

In this recipe I used a combination of almond flour, olive oil, brown sugar, and lemon zest, leaving me with a nutty, fruity, and tender muffin, great for any breakfast on the go.

Image

I couldn’t resist adding a bit of tartness to it, so peaches it was! You could really eat these muffins with any fruit, but I love the lacquered sheen of these peaches once they’re cooked. It adds a nice amount of acidity and sweetness that I think pairs well with the nuttiness of the muffin.

Chia Olive Oil Muffins with Caramelized Peaches

Makes 5 muffins

10 g whole chia seeds

50 g water

125 g almond flour

62 g cake flour

4 g baking powder

1 g salt

60 g extra virgin olive oil

40 g organic brown sugar, plus more for peaches

28 g water

3 g vanilla extract

about 1/2 teaspoon lemon zest

2 ripe peaches

In a small bowl, stir together your chia seeds with 50 g of water, and let sit for 20 minutes until it forms a gel. Preheat your oven to 350F. Grease a medium-sized muffin tin with olive oil or line with cupcake liners. Sift together your almond flour, cake flour, baking powder, and salt. In a large bowl, whisk together your extra virgin olive oil, brown sugar, 28 g water, vanilla extract, and lemon zest until combined. Whisk in your gelled chia seeds, water and all. Whisk in your dry ingredients, just until combined. The batter will look a bit lumpy and thick, like oatmeal. Distribute batter into your muffin tin, filling each well about 3/4ths of the way up and smoothing out the top. Bake for about 30 minutes, or until the tops of the muffins are golden brown and a toothpick inserted in the center comes out clean. Let cool in pan completely before removing. Store at room temperature.

For caramelized peaches: Set your oven to broil and place a rack on the highest level of your oven. Cut peaches in half and remove pit. Place peach halves on a lined sheet pan and cover the tops of each half with an even layer of brown sugar. Put under your broiler for 3-4 minutes, until all the sugar is melted and bubbles, and the peaches look shiny and lacquered. Let cool completely, then peel off skin (this should be easy since the peach is cooked) and cut into slices. Enjoy!

Standard
Breakfast, Custard, fruit, Recipes

Lychee Pudding with Strawberry Salsa

Image

It’s hot. It’s hot, I have a ton of egg yolks in my fridge, and a craving for something sweet. There’s no way I’m touching the oven today so cakes are out of the question. I guess I could make ice cream, but that would require me to pull out the ice cream machine, freeze the bowl, and then go through a multitude of other steps that I really don’t have the patience for right now. So what can I make? A custard, of course!

Image

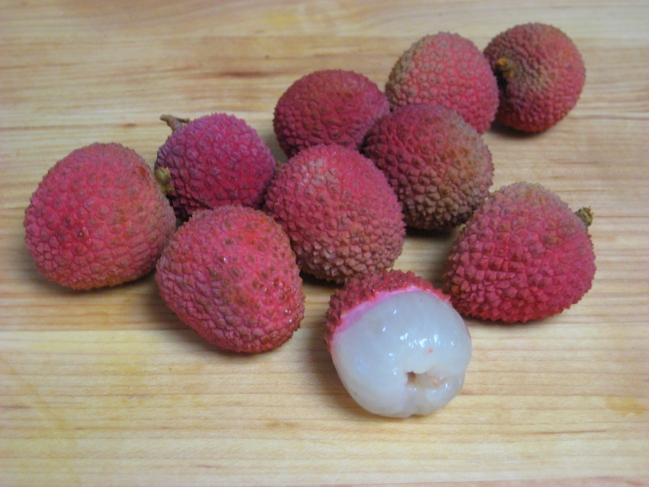
Lychee, litchi, whatever you want to call it, is an amazing little fruit. I love it for the lightly sweet and delicate floral flavor it provides, and when it’s ripe it’s amazingly juicy.

Image

I know, it looks kinda like a bowl of raw calamari. But it’s delicious, I promise! Within that rough exterior lies a juicy, tender, burst of flavor, just waiting to sweep you off of your feet and into a tropical paradise.

Image

The pudding itself is a creamy custard that is cooked over the stove much like a pastry cream. I topped it with a tart strawberry salsa and a quenelle of airy whipped cream, and garnished it with some lemon zest. The tartness of the strawberries really balances well with the smooth, creamy custard and just gives your mouth a little “pop” when you bite into them.

Lychee Pudding with Strawberry Salsa

For lychee pudding:

134 g fresh lychee (peeled and seeded)

530 g milk

180 g heavy cream

80 g granulated sugar

115 g egg yolks

10 g cornstarch

25 g Soho or other lychee liqueur

30 g butter

For strawberry salsa:

95 g finely diced strawberries

1 g lemon zest, plus more for garnish

15 g guava juice (you could use orange or any other citrus juice really, this is just what i had on hand)

5 g sugar

For lychee pudding: In a food processor, blend lychee meat until completely pulverized. You pretty much don’t want to see any lumps. Strain out any pulp with a fine mesh sieve, and make sure to push on pulp to release all of the juices.

In a medium sized saucepot, combine lychee juice, milk, and cream, and bring to a scald over medium low heat.

In another bowl, whisk together sugar, egg yolks, and cornstarch. When milk mixture is hot enough, temper in your yolk mixture, then cook over the stove until custard looks about the consistency of a gravy (this will take a few minutes). You want to stir the pot constantly while it’s cooking to prevent scorching and to keep the eggs from curdling. When the custard is thick and you start to see bubbles forming in the middle of the pot (from boiling), turn off your heat and whisk in your butter and Soho.

Divide your custard between your serving dishes (I divided it between 4 bowls, but these portions were kind of large), then cover with plastic wrap and chill for at least 2 hours (but preferably overnight) before serving.

For strawberry salsa: The salsa is best when made the day that you are serving it, so that the fruit doesn’t break down too much with all the citric acid. Combine your finely diced strawberries with the lemon zest, juice, and sugar, and lightly toss them together. Let sit for a few minutes until the sugar dissolves, then divide between your dishes and spoon the salsa on top of your custard. Top with a dollop of whipped cream if you like, then enjoy!

Standard
Breakfast, Cake, Candy, fruit, lunch, Recipes

Blood Orange and Almond Torte

IMG_5019

The other night one of Robert’s friends invited us over for dinner with him and his wife, and I knew I wanted to make something sweet for the two of them.

Image

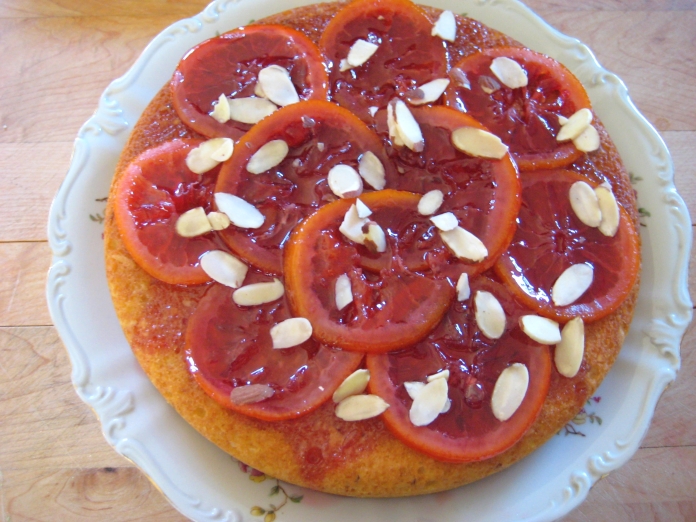
I wandered around the market in search of ideas. Once I saw the cart full of blood oranges, I immediately knew what I wanted to make. I made a hearty, almost rustic almond cake and topped them with the sweet, syrupy oranges.

IMG_5011

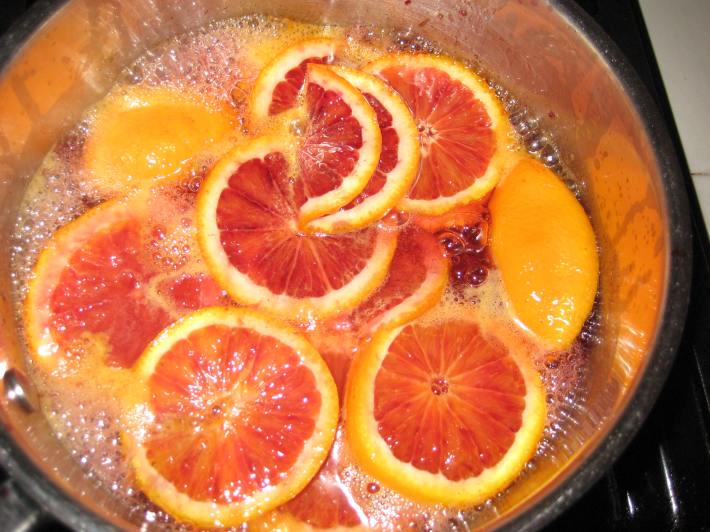
I love the deep color of the blood orange and the sweetness it holds; not overly tart and just slightly bitter from the pith. I cooked them in a syrup with hints of cinnamon, giving it a bit of warmth.

IMG_5025

The textures in the torte are what makes it such a great dessert; you get the crunch from the almonds, the chewiness from the candied oranges, and the dry crumb from the cake itself. This recipe is quite quick, and I will definitely be using it again, with other citrus fruits as well.

Blood Orange and Almond Torte

makes 1 (9inch) torte

For almond torte:

40 g granulated sugar

113 g butter, soft

55 g buttermilk

100 g egg

3 g vanilla extract

150 g All Purpose flour

8 g baking powder

1/8 teaspoon salt

35 g sliced almonds, plus more for garnish

Preheat your oven to 350F. In the bowl of a stand mixer, cream together sugar and butter with the paddle attachment until light and fluffy.

Coarsely chop the almonds, and in a separate bowl whisk together flour, baking powder, salt, and almonds until there are no lumps. Set aside.

In another bowl, whisk together buttermilk, eggs, and vanilla extract, then slowly stream into the sugar/butter mixture while mixer is running on medium speed, until all liquid is absorbed. Scrape bottom of bowl with a rubber spatula as needed. Change speed to low, then add dry ingredients, and mix just until all ingredients are combined. Batter will be quite thick.

Grease a 9″ cake round, and spread batter evenly into round, and bake 25-27 minutes or until sides of the cake have browned and pulled from the cake pan, and a toothpick inserted in the center comes out clean. Let cool completely in pan, and turn over onto your serving plate.

For Candied Blood Oranges and syrup:

280 g granulated sugar

150 g water

10 g dark rum

2 cinnamon sticks

juice of 2 blood oranges (about 80 g)

1-2 blood oranges, sliced 1/8″ thick

Combine all ingredients in a small sauce pot, and bring to a boil. Over medium heat, let syrup boil until reduced by half (about 20 minutes) and rinds of orange slices become slightly translucent. Using tongs, carefully arrange slices on top of your torte. Chill syrup until it thickens to the consistency of honey, then discard cinnamon sticks and drizzle syrup over the top of the oranges, letting it drip down the sides of the torte. Garnish the top of the torte with more sliced almonds, and enjoy!

Standard
Breakfast, Custard, Dinner, fruit, lunch, Recipes, Savoury

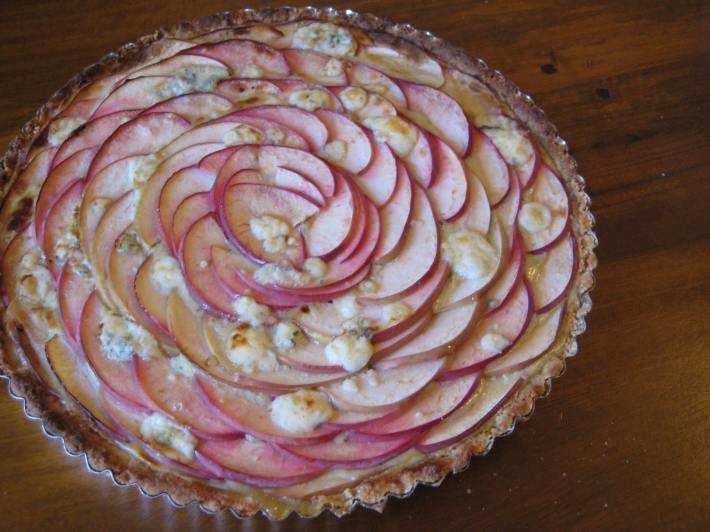
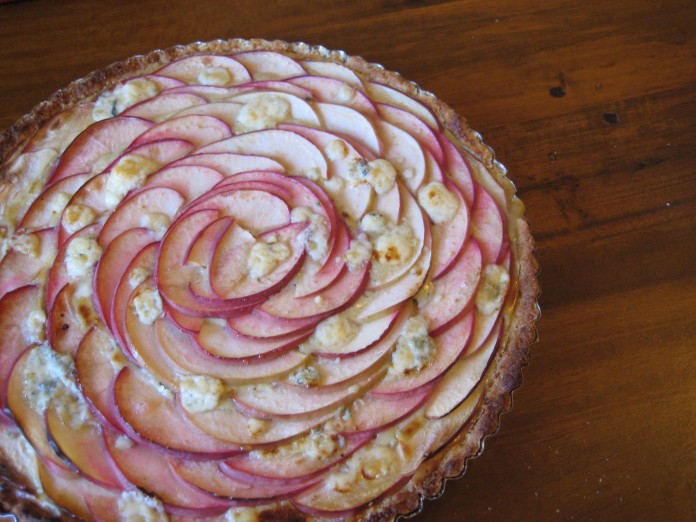
Marzipan and Gorgonzola Apple Tart

Image

So I know that apples are more of an autumn thing, but Southern California has been ridiculously cold lately. I mean like, freezing. Usually in the morning I like to go for a jog at the beach, but with all the crazy winds and icy temperatures, I decided to just stay home and bake something to warm me up a bit.

IMG_4927

Almonds, gorgonzola, honey, and apples. It’s like an entire cheese platter mixed together to make an amazingly sweet and savory breakfast tart or tea time snack.

IMG_4929

For a quick and flavorful tart, I’d definitely say try it. The marzipan crust lends a crumbly, crunchy texture, while the gorgonzola custard filling adds a nice creamy touch.

Marzipan and Gorgonzola Apple Tart

Makes 1 (10″) tart

For Marzipan tart shell:

112 g unsalted butter, soft

120 g marzipan, soft

160 g All Purpose flour

60 g granulated sugar

3 g salt

Preheat your oven to 375F. In a bowl of a stand mixer, paddle together butter and marzipan until smooth. Add your flour, sugar, and salt, and paddle until combined and dough forms large crumbles. Press dough firmly into a greased tart pan, and parbake shell for 12-15 minutes, until it turns a light golden brown. Remove from oven and let cool slightly.

For filling:

90 g crumbled gorgonzola cheese, plus more as needed

70 g heavy cream

50 g egg (1 large egg)

cracked black pepper, as needed

2 apples, cored and sliced thinly (I used Red Romes)

honey, as needed

Whisk together gorgonzola, heavy cream, egg, and black pepper, leaving some large pieces of gorgonzola in tact. Pour custard over cooled tart shell. Arrange apple slices along the inside of the tart, fanning them out as you go. Lightly drizzle honey over apples.  Bake at 375F for 18-20 minutes until filling is set.

Pull out tart from oven and set your oven to broil. Sprinkle some more gorgonzola crumbles over the top of the apples, and broil 2-3 minutes, until cheese starts to brown and bubble. Let cool slightly before digging in!

Standard
Breakfast, Cake, fruit, Recipes

Spiced Quince Muffins

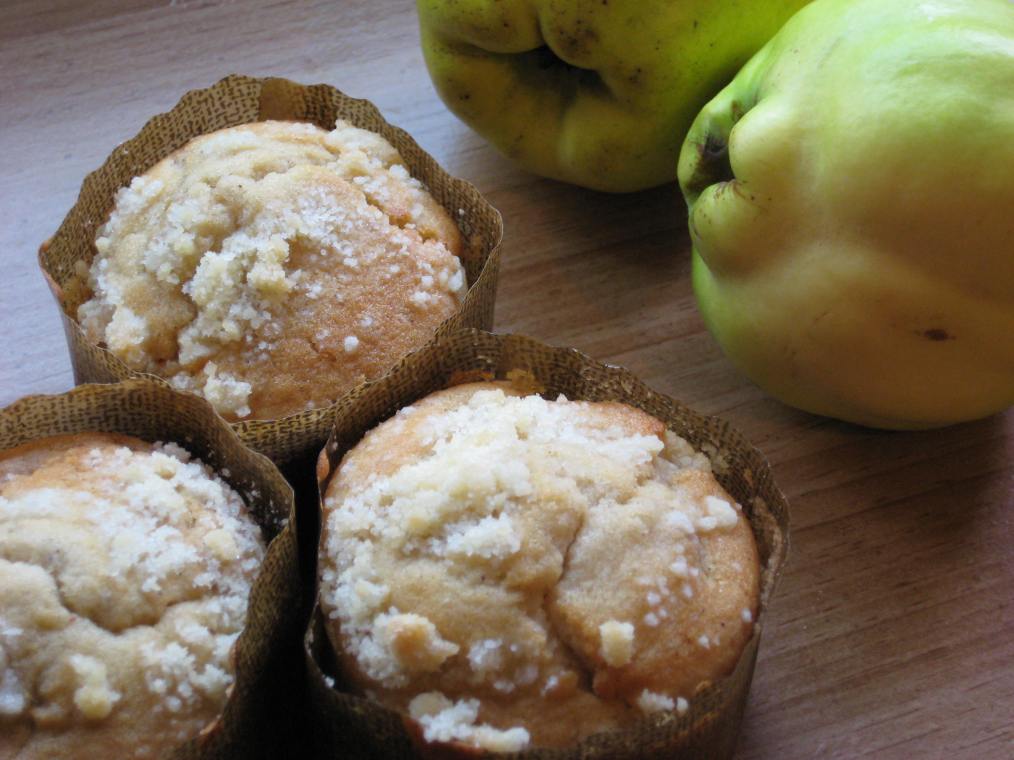
Image

One of the reasons I love living in California is the expansive list of fruits and vegetables that we can grow here. Recently I tried my first quince, a fruit from the same family as apples and pears, with hard flesh but a tart and tropical flavour.

Image

After my first taste of this fruit, I decided it would make the perfect Autumn muffin when paired with a few spices here and there. I added hints of cinnamon, nutmeg, and allspice, and combined it all into a fluffy and incredibly tender muffin. I also mixed equal parts sugar, butter, all purpose flour, and almond flour to make a simple streussel crumble to top each muffin.

Spiced Quince Muffins

makes 6 large muffins

157 g fresh quince, diced small

2 each cinnamon sticks

1 g allspice

10 g brown sugar

———————————————

100 g unsalted butter, soft

90 g brown sugar

140 g cake flour

1 g salt

1/2 g nutmeg

1 g allspice

5 g baking powder

110 g egg

8 g vanilla extract

115 g buttermilk

Toss together diced quince, 10 g brown sugar, cinnamon sticks, and allspice, then saute over medium heat until sugar melts and quince has softened slightly. Let cool to room temperature, and set aside.

Preheat oven to 350F. Sift together cake flour, salt, nutmeg, allspice, and baking powder, set aside. In a bowl of a stand mixer fitted with a paddle attachment, cream together butter and brown sugar until very pale. With mixer running on medium/high, slowly stream in eggs and vanilla extract until combined, scraping sides and bottom of bowl with a rubber spatula as needed. Add dry ingredients and mix on low. Scrape sides of bowl again, and with mixer on low, stream in buttermilk. Discard cinnamon sticks, then fold in quince into batter.

Divide batter between muffin papers, then bake for 20-25 minutes or until a toothpick inserted in the center comes out clean. Let cool completely in pan before removing.

Standard
Breakfast, Recipes, Savoury

Fig and Bacon Jam

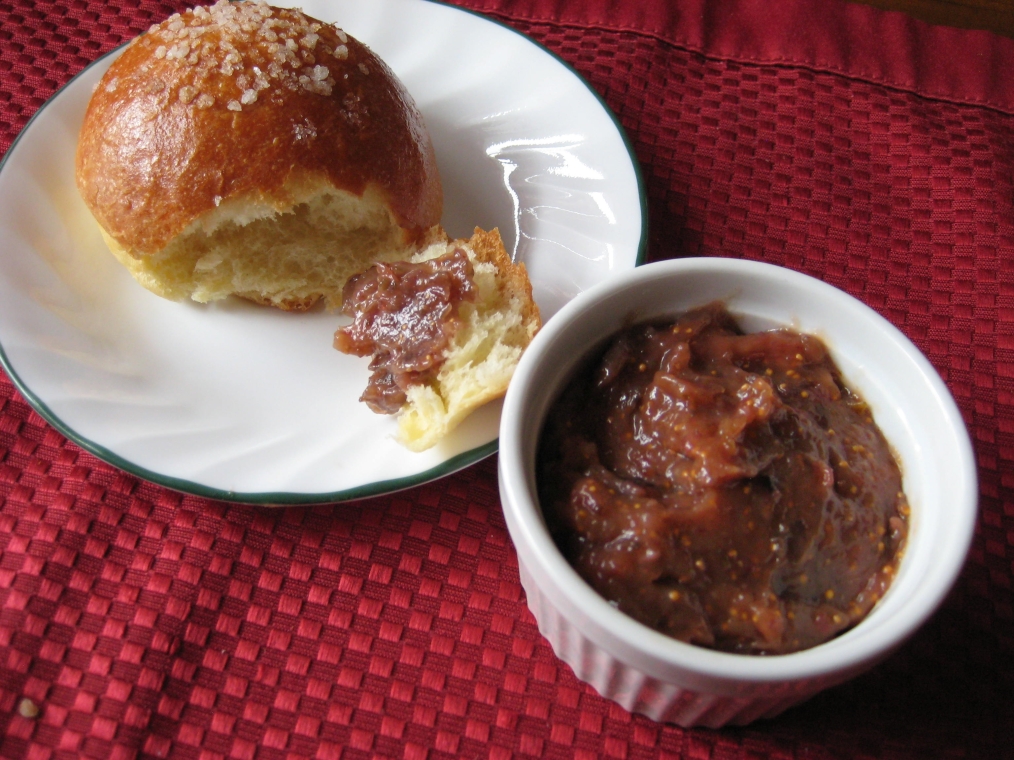
Image

I love crossing the lines between sweet and savoury. As someone who makes sweets for a living, it’s nice to change  things up a bit.

Image

Yesterday I had some very ripe figs, and decided I wanted to make something both sweet and salty to satisfy my cravings. I love that the bacon lends a nice smokey undertone to the sweetness of the figs. This morning for breakfast I had the jam with some fresh baked brioche and some truffle pate. Ohh yes, it was that kinda morning.

Fig and Bacon Jam

makes about 1 L

185 g thick cut bacon

50 g brown sugar

787 g very ripe figs, stemmed and quartered

198 g granulated sugar

10 g pectin

1/8 tsp salt

Dice bacon into 1/4″ pieces. Over medium heat, fry bacon until lightly golden, then add brown sugar and toss bacon to coat in sugar. Cook until sugar is melted and bacon is caramelized. Add figs and stir into bacon. Using a rubber spatula, stir figs frequently to prevent scorching on the bottom of the pot. Let mixture simmer until figs have broken down quite a bit.

In a separate bowl, whisk together sugar and pectin until there are no lumps. Add sugar mixture to pot and toss figs and bacon in sugar. Let simmer until jam is very thick, stirring to prevent scorching. If desired, blend about half of the jam to make it more smooth. Keep in an airtight container and keep refrigerated. Enjoy the next day!

Standard