Cake, Chocolate, fruit, Petit Four, Recipes

Raspberry Dark Chocolate Cakelettes, Instagram, and a Happy (Early) Valentine’s!

Image

Valentine’s Day is just around the corner and although I typically am not big on “Hallmark Holidays”, I still love to indulge a bit in what is supposed to be our nation’s day of love. After purchasing a copy of Paris Patisseries and rifling through page after gorgeous page, I was inspired by a picture of Pain de Sucre’s raspberry heart cakes and knew I wanted to make something similar of my own. But of course, it’s not quite Valentine’s Day without a bit of chocolate, so I made these not only raspberry flavored, but also added in some very dark (72%) chocolate.

Image

I immediately went to my specialty foods store and bought this adorable heart fleximold. Isn’t it cute?? And as a baker, there is no better feeling than having a new, fresh fleximold. After working in a kitchen full of old, beat-up molds, a new one is the stuff of dreams.

Image

Also, I know that these look very similar to Red Velvet cakes, but I can assure you that they’re not! In fact, if you love chocolate, they’re even better than Red Velvet! These cakelettes have a very tender and dense crumb, and a very smooth mouthfeel. The chocolate lends them an almost creamy richness as well. The raspberry flavor comes from straining raspberry preserves through a fine mesh sieve, and using what looks like an intensely-flavored thick raspberry syrup that is left after straining. This step is a bit tedious, but is certainly worth the trouble. I highly recommend these if you’re looking for something to make for your Boo on that special day *wink wink*

Before I post the recipe, I wanted to let you guys know that after high demand, I’ve started an Instagram! So if you’re interested in seeing some of the things I make at work or taking a peek at my life outside this blog, feel free to follow me at #lainey_made! I promise you I won’t post anything lame or inappropro!

Raspberry Dark Chocolate Truffle Cake

makes 12 (2.5″) cakelettes

168 g strained raspberry preserves (I strained about 2/3 of a 16oz container, but what you get leftover depends on how thick the preserves are)

186 g 72% dark chocolate, chopped

200 g whole eggs (4 large)

80 g granulated sugar

100 g cake flour

5 g baking powder

4 g salt

1/2 tsp. red gel color

After straining raspberry preserves, discard pulp and seeds, and use only the syrup left over.

Preheat oven to 330F. Using a double boiler over low heat, melt chocolate and after completely melted, gently stir in raspberry syrup until emulsified. Turn off heat but keep bowl over the double boiler to keep it warm.

In a bowl of a stand mixer, whip eggs and sugar until eggs are very pale and reach ribbon stage. While eggs are whipping, sift together cake flour, baking powder, and salt.

When eggs are done whipping, gently fold in chocolate/raspberry mixture until almost fully incorporated. Fold in flour mixture, then fold in red gel color. Eggs will deflate a bit while folding, so don’t worry too much if it loses some volume.

Distribute batter evenly between molds, and bake 18-20 minutes. Cakes are done when you can start seeing tiny cracks on top. Let cool completely in molds and then enjoy eating them with someone you love!

Standard
Cake, Chocolate, Custard, fruit, Home

Happy Birthday (To Me)!

Image

Another year, another birthday cake made by yours truly. Little Lainey is finally 23! Those of you who know me know that I’m not really big on celebrations (for myself, at least), and that what I really like to do on my birthday is use it as a time for reflecting on some of the things I’ve accomplished and mistakes that I’ve made within the last year and within my lifetime; I think for someone as young as myself, there are actually quite a bit of each!

Image

Because I have to work today, I spent the last couple of days by having dinner with my family, and spending an awesome relaxing day with the hubby. I also went to the beach for a couple of hours to do some of that reflecting I was talking about.

Image

This cake was kind of a last minute decision, so no recipes for this post (sorry!). For anyone who’s interested, though, it has layers of an almond olive oil sponge cake, dark chocolate, fleur de sel, and olive oil ganache, and a citrus cream. I wasn’t 100% in love with these recipes (maybe more like 85-90%) which is also why I wanted to wait on posting them till I get it right. The overall taste was good though, regardless (:

Anyway, in regards to the things that I’ve accomplished thus far in this short life, according to my husband I’m doing pretty well for someone my age, so I think I’ll take his word for it (:

Standard
Cake, Chocolate, Petit Four, Recipes

Green Tea & Black Sesame Halva Gateaux

Image

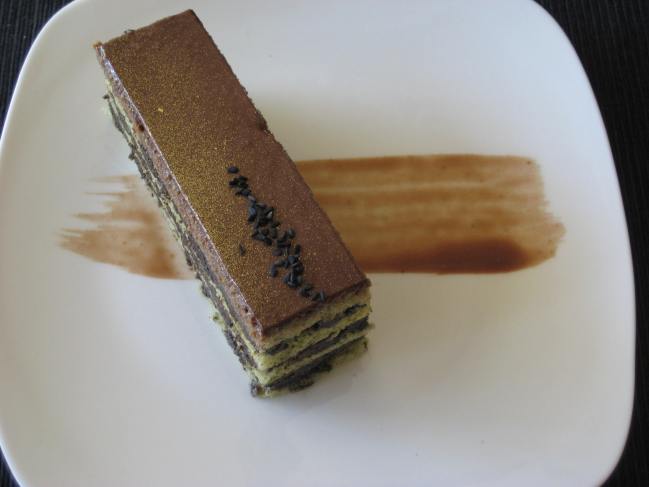
I love green tea. I also happen to love coffee. Since I’ve been making so many fruit-based desserts lately, I wanted to switch things up a bit and make something that has a bit of bitterness to it rather than something tart, but I was torn on which to pick; green tea or coffee? Why not both?

Image

This cake has layers of green tea sponge cake and black sesame halva filling, and is topped with a creamy mocha glaze. I have to say, the flavor combination couldn’t be more perfect.

Image

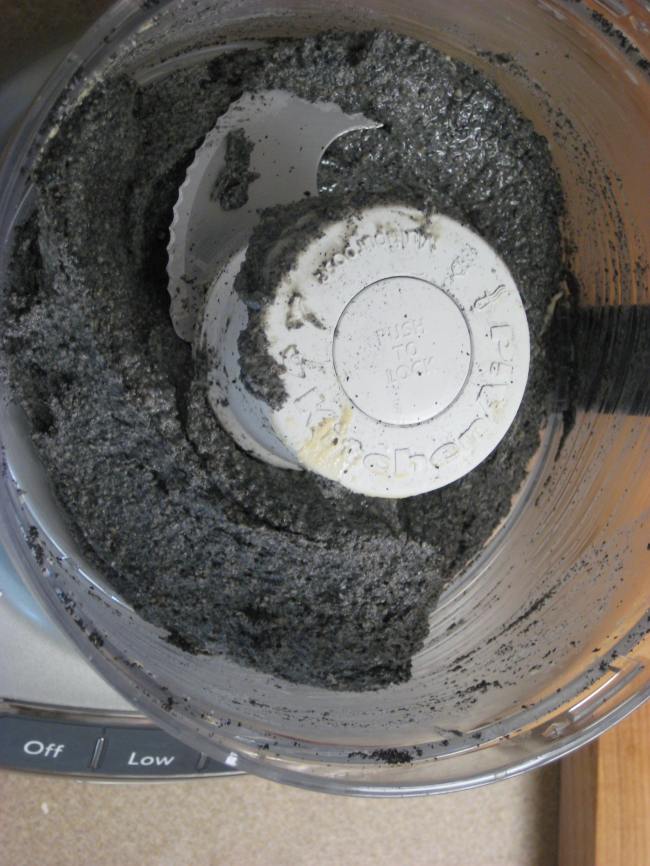
The black sesame filling before adding your chocolate. Halva is a sweet sesame paste, similar in texture to tahini but much, much sweeter. It provides an intensely nutty flavor to the cake, and the addition of toasted black sesame gives a slight crunch to the filling.

Image

Overall, I’m very satisfied with how this cake came out. I’ll admit that I was a little hesitant about the outcome as I was making it since I was just experimenting with these flavors, but it turned out to be one of the best tasting cakes I’ve made yet, so I’m very proud of it!

Green Tea & Black Sesame Halva Gateaux

makes 6 (1″x 4″) bars

For green tea sponge cake:

100 g egg yolks

50 g whole eggs (1 large egg)

80 g granulated sugar

95 g cake flour

3 g baking powder

12 g sweet matcha powder

a scant pinch of salt

for black sesame filling:

85 g black sesame seeds

255 g soft halva (1 9oz package)

170 g milk chocolate, melted

for mocha glaze:

5 g powdered gelatin

25 g water

40 g sugar

20 g cocoa powder

a pinch of salt

213 g strong coffee

60 g heavy cream

For green tea sponge: Preheat your oven to 350F, and grease a 13×17″ jelly roll pan, and line it with parchment paper. In the bowl of a stand mixer, whisk together egg yolks and whole eggs with sugar on high until eggs are pale and very thick. In another bowl, sift together your cake flour, baking powder, matcha, and salt. Fold your dry ingredients into your eggs, and spread batter over your sheet pan using an offset spatula. It should be a very thin layer. Bake for 12-15 minutes, or until the top of the cake just barely gets a little color. Cool completely, then refrigerate.

For black sesame filling: Toast your black sesame seeds in a pan over medium high heat until the seeds become slightly aromatic, then while seeds are still hot, pulse in a food processor for about 1 minute, just to break up the seeds. Add your soft halva to the seeds and blend another minute until mixture is slightly smooth. You don’t want to blend it too much because you want it to still be slightly crunchy. Add your melted chocolate and blend just until combined. Mixture will be really thick. Store at room temperature.

For mocha glaze: Bloom your gelatin in your water. In another bowl, whisk together sugar, cocoa powder, and salt until there are no lumps. Set aside.Ā  In a small saucepot, combine your coffee and cream and heat over medium heat until steaming. Whisk in your sugar/cocoa mixture, then whisk in your gelatin mixture, and just heat until the gelatin is melted and the sugar is dissolved. Glaze will be really thin. Chill until glaze thickens slightly (this could take a couple hours depending on how hot you got your coffee/cream).

For assembly: Cut your cooled sponge cake into quarters, then spread a layer of your halva filling on top of one of the cake quarters, and layer on the next cake, and repeat, finishing with sponge cake on top and pressing down to make sure the surface is flat. Chill until filling is firm. When glaze has cooled, cover the cake using about half ofĀ  your glaze (the top layer of sponge will absorb this glaze because the glaze is thin) and refrigerate until set. Pour the rest of your glaze on top, then spread into an even layer over the cake. Glaze should look glossy. Refrigerate until glaze is set, then using a very hot, clean knife, trim off edges of cake and cut into bars (you should get 6 (1×4″) bars). I dusted the top of mine with a bit of gold dust and then sprinkled some more black sesame seeds on top for garnish. Enjoy!

Standard
Chocolate, fruit, Gluten Free, Recipes

[Gluten-Free] Mint Ganache and Almond Tart

Image

If I had a weakness (or a few), I would say one of them is dark chocolate. And they say it’s good for you, right? Antioxidants and such? That’s what I like to tell myself, at least, whenever I feel like indulging.

Image

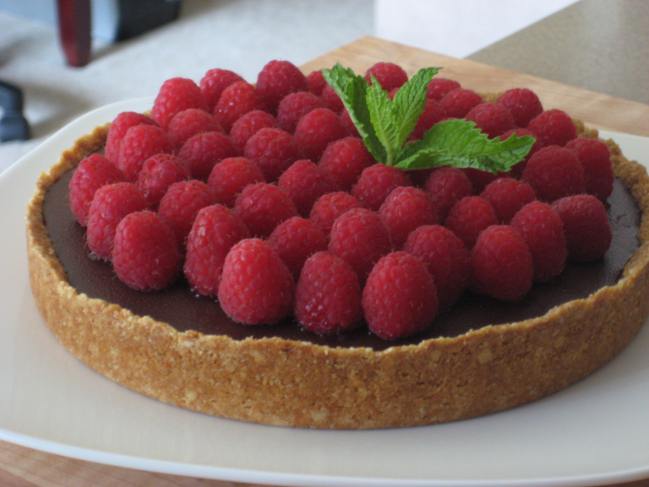
Because it’s summertime and the sun apparently loves to beat down on us this time of year, I wanted to make something with dark chocolate that isn’t overpowering or too heavy. I wanted something decadent but refreshing as well. Mint and raspberries made the perfect match!

Image

The crust on this tart is made with almond flour, which gives it a nice crunch that pairs well with the creamy, chocolatey ganache. It also happens to be gluten-free, which is another added bonus to an already lovely tart.

[Gluten-Free] Mint Ganache and Almond Tart

For Gluten-free Almond Crust:

220 g almond flour

30 g granulated sugar

45 g melted unsalted butter

4 g almond extract

1 g salt

For Mint Ganache:

210 g heavy cream

4 g fresh mint leaves

216 g dark chocolate (I used Valhrona 53%)

25 g milk chocolate (I used Callebaut 33%)

15 g unsalted butter

10 oz fresh raspberries, for garnish

For the crust: preheat oven to 330F. Grease an 8″ tart pan and line the bottom with parchment paper. Mix together almond flour, sugar, melted butter, almond extract, and salt until combined. Press firmly into the bottom of your tart pan, keeping the thickness of the tart shell even around the pan. Bake for about 35 minutes, or until the entire shell is a dark golden brown. Cool completely before filling with ganache.

For ganache: Muddle and tear mint leaves, and combine with heavy cream in a small saucepot. Bring cream to a simmer then let mint steep for at least 10 minutes. In a separate bowl, combine milk and dark chocolates, then melt over a double boiler or in a microwave.

Bring cream to a simmer again, then strain out mint leaves and pour hot cream over chocolate. Whisk until combined, then whisk in your butter until mixture is smooth. Pour ganache over the crust, and tap the pan lightly on your counter to flatten out the top.

Freeze tart until firm (I waited overnight), then pop the tart out of the pan and onto your serving dish, and garnish the top with fresh raspberries and a sprig of mint. Wait about an hour for the tart to fully defrost, then enjoy!

Standard
Cake, Caramel, Chocolate, Cookies, Custard, DIY, fruit, Petit Four, Places, Wedding

Wedded Bliss Part 4: The Cake, The Day

399906_10201060574337950_178797941_n

After over a year of planning, last Saturday Robert and I finally got married! A couple of hours ago we just got back from our amazing honeymoon (woot Vegas!) so now I finally have some time to show you guys a couple of pictures. I’m not going to post up too many pictures just because the photographers we hired need a couple more weeks before all the images are edited, but I just wanna give you guys a taste of our special day.

IMG_5428

Macaron craziness. I made roughly 400 macarons to give as our favors for our guests. Soo much effort but it was totally worth it! Each person got a raspberry lychee rose macaron, a hazelnut caramel macaron, and a dark chocolate, olive oil, and fleur de sel macaron.

IMG_5438

All packaged and ready to go! Because of the massive number that I had to make and how tiny our apartment is, I would say this was more than a challenge, but it all worked out in the end. I also had some help from the hubby with packaging them šŸ™‚

User comments

Trying to Tetris the tiers of our cake into our fridge. The cake was literally the easiest part of the wedding planning. For a long time I already knew what I wanted to do and how I wanted it to look, and it definitely helped that I build wedding cakes at work all the time.

164641_10201060582378151_1024440684_n

The finished cake: coconut sponge cake, lemon curd filling, and Italian buttercream. We had one of Robert’s friends help us deliver the cake and stack it the morning of, so that was a good amount of weight off of our shoulders and it turned out looking just as awesome as I imagined. I love how rustic and homemade (but also clean and finished) it looks.

395642_641188255894925_800580002_n

Cutting into our cake. The gumpaste peonies held up throughout delivery and the day of, so I’m pretty proud of that as well.

404745_10200502927830170_862987853_n

Anyway, I hope you guys enjoyed my little post about our big day. The weather was amazing, the food was amazing, and the entire day couldn’t have been any better. I am now happily married to the most amazing man I’ve ever met, and looking forward to a lifetime of happiness with him. While I didn’t get a chance to post about some of the other wedding-related crafts I made (our guest book, our painting, the chair hangs, etc.) hopefully you all got a good taste of what went on during these “Wedded Bliss” posts. Love you guys, and thanks for reading! šŸ™‚

Standard
Cake, Candy, Chocolate, Cookies, Crafts, DIY, fruit, Petit Four, Wedding

Wedded Bliss Part 3: Flowers and Showers

Image

Yesterday Robert’s mom was kind enough to throw me a bridal shower, and I have to say it was a lot of fun! We played games, won prizes, had awesome food, and I got to open up some great and very thoughtful gifts.

Image

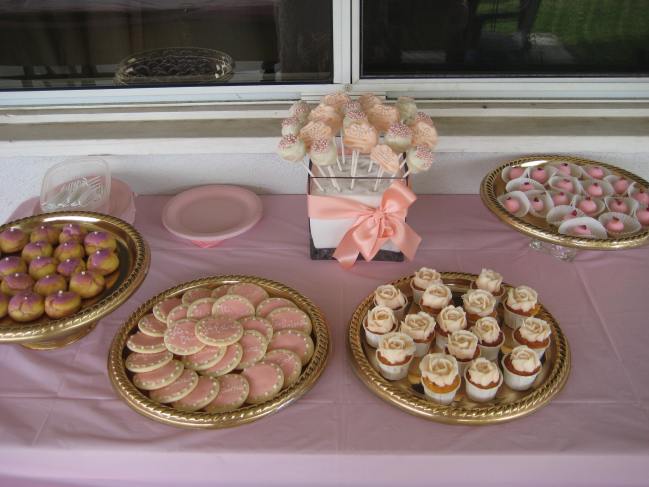
All the bridesmaids seemed to enjoy themselves as well, so I’m pretty happy about that. The theme colors were pink and gold, and I wanted to make a little dessert buffet to match that.

Image

The spread looks kinda small, but we were only expecting 20 or so people, so it ended up being just enough desserts!

Image

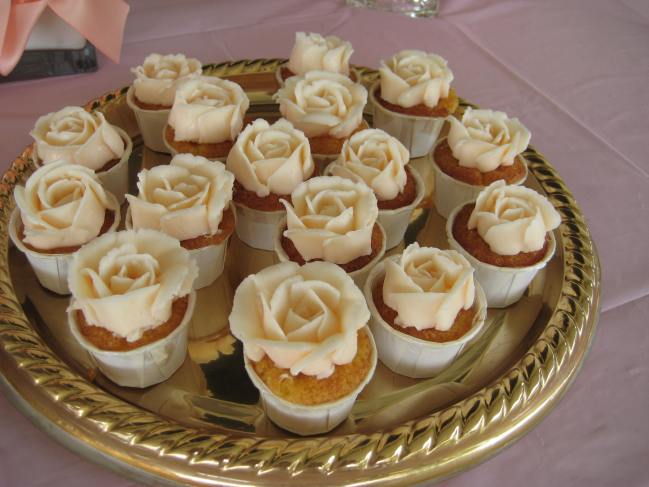
Mini almond and orange cupcakes with buttercream roses.

Image

Strawberry and rose truffles. I absolutely LOVED these babies, and they were so easy to make. Not gonna lie, I left a few of these at my house to snack on….

Image

Coconut cake pops and mango-peach marshmallow lollipops. The marshmallow lollipops turned out a little more difficult to make than I remember, but they came out really cute and pretty damn delicious so I’m proud of them!

Image

Lemon sugar cookies that say “je t’aime.” Cute and simple!
Image

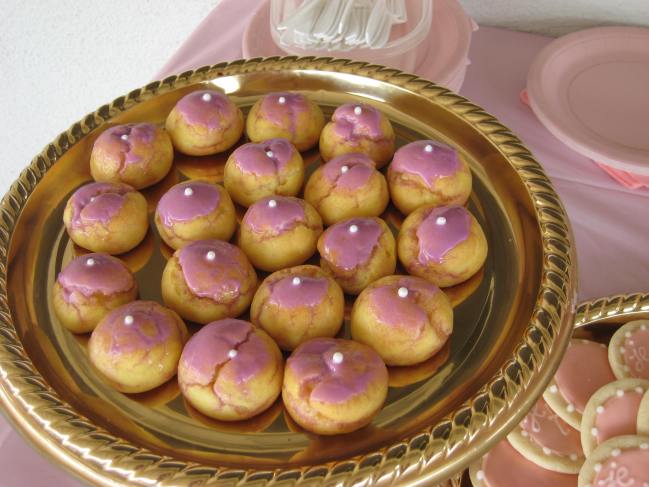
Vanilla pate a choux. Another simple flavor, but just a good, comforting dessert. I left some of these at home for me too, hahaha.

I’ve also spent the last couple of weeks making gumpaste peonies for the wedding cake, and they’re finally finished! The colors are a little dark in the pictures because the gumpaste needs a few more days to dry, but here’s a few progression shots for ya’.

Image

Lil’ buds

Image

The first layer of petals

Image

Second layer

Image

Third layer. Lookin’ good so far!

Image

Fourth layer, getting too big for the egg carton!

Image

A finished peony; my babies are all grown up! I’m pretty proud of how these turned out. I don’t have TOO much experience making gumpaste flowers and I’ve never made peonies before, so these ended up being a lot of work and trial and error. In total it took me almost 3 weeks to finish all of these (this includes drying time and all the breaks I took in between for work and the dessert buffet, haha), but I would definitely say it was worth it.

Image

It’s kinda hard to see all the veining in there, but it’s there! The flowers are super delicate, so here’s hoping they actually make it to the wedding. Hope you all enjoyed my very pink post, and look forward to more!

Standard
Cake, Chocolate

Cake Orders and a Busy Week

Image

As you can tell from my lack of posts lately, my week has been quite busy! I worked 6 days this week at the hotel, and it’s another 8 days until my next day off. Let me just say, thank god for California Law and overtime pay!

Image

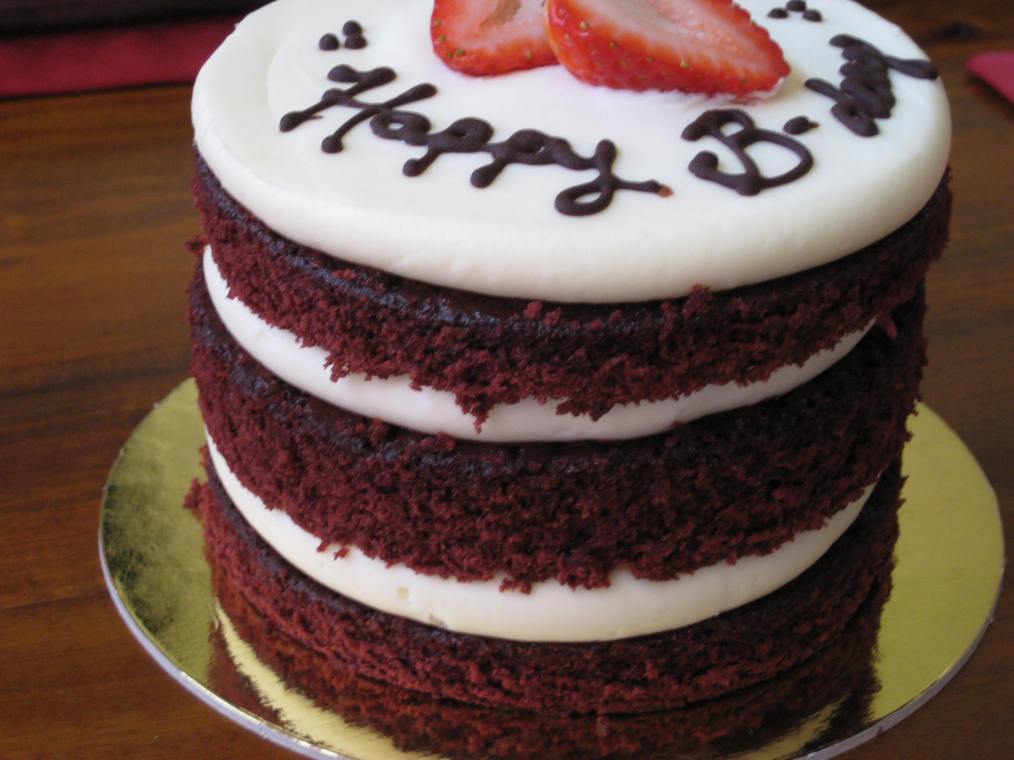
This cake is a mini (5-inch) red velvet cake that I made for my brother’s 30th birthday. No frills since it was just our family having dinner together, just clean and simple. Hopefully everyone enjoyed it!

Image

This one is a cake that my cousin ordered with both Disney’s Pocahontas and Mulan theme. I’m a little annoyed that the letters ran together but she loved it nonetheless!

Image

Inside are layers of vanilla sponge cake and milk chocolate chantilly. I tried to keep the decor minimal while still keeping the theme recognizable. With any cake geared toward children’s movies, it’s easy to go over the top with the details.

Image

I feel pretty satisfied with how this cake came out, and I’m glad that it looks tasteful (i.e. not gaudy haha). My cousin just picked it up, so hopefully it will last the ride home! The next couple of weeks will be quite hectic, as Robert’s birthday is coming up, and after that is our anniversary! I’m looking forward to all the fun we’ll have, but not so much all the sleep I’ll lose, haha.

Standard
Cake, Chocolate, Custard, fruit, Recipes

Chamomile and Lemon Verbena Entremet

Image

As a huge believer in anything tea-related, I love sampling any kind of tea I can get my hands on. When I got a hold of Mighty Leaf’s Chamomile Citron, it was like love at first sip. I knew I had to make some kind of dessert with it, one that wouldn’t hinder its delicate citrus notes and natural sweetness.

Image

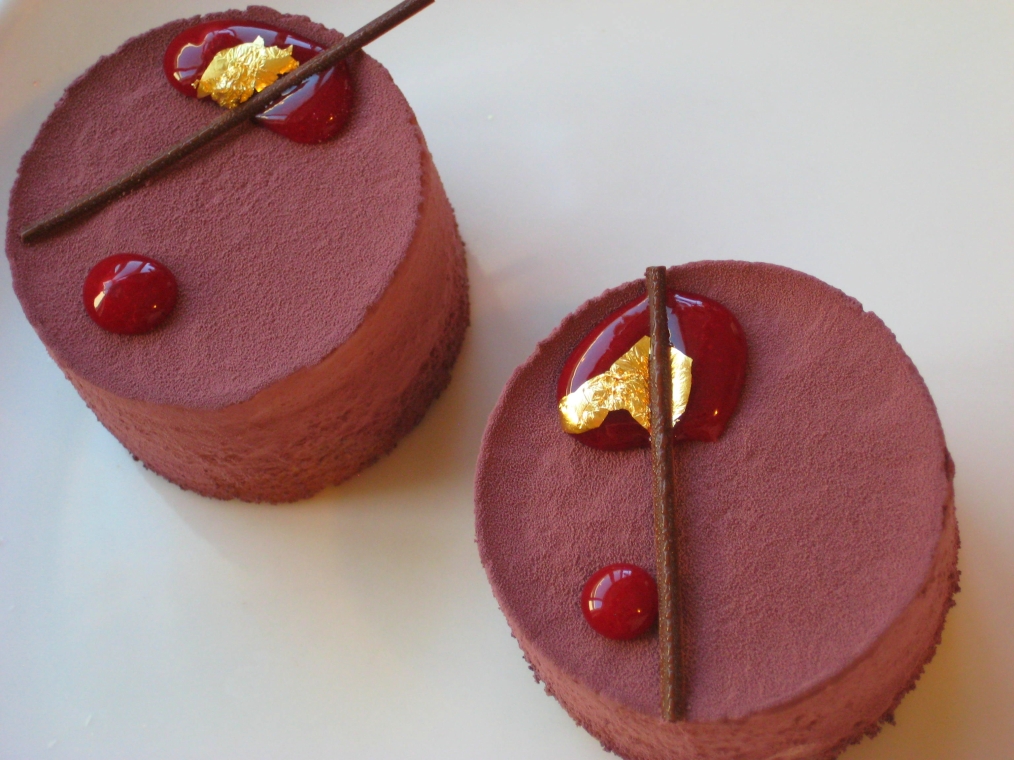
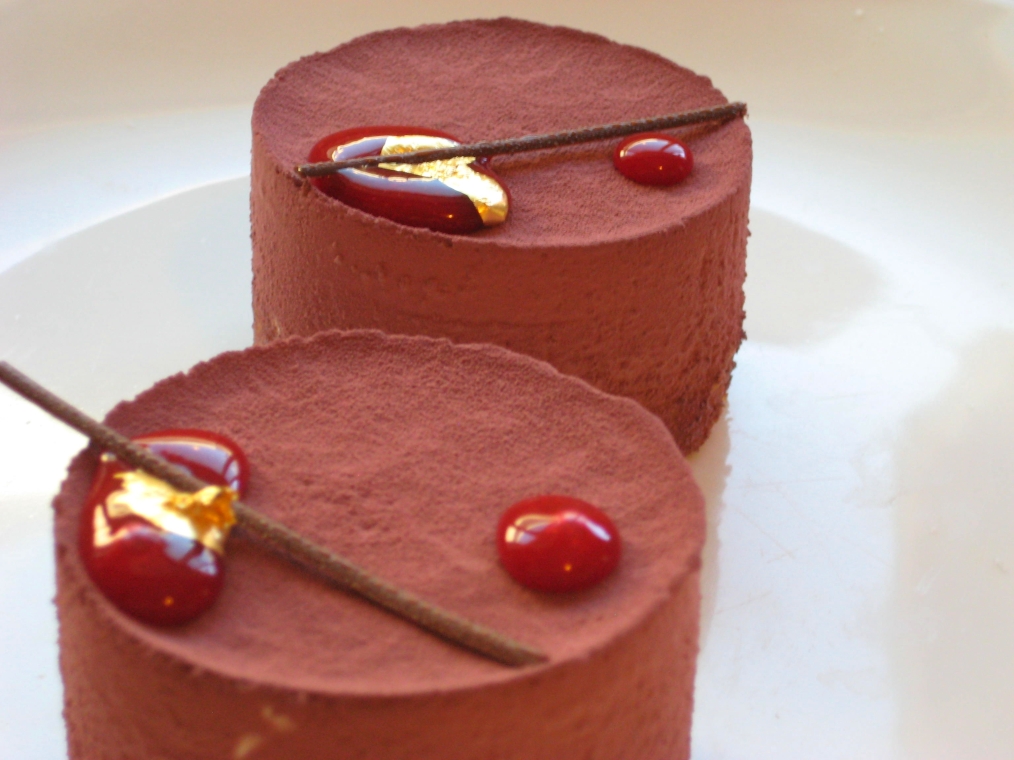
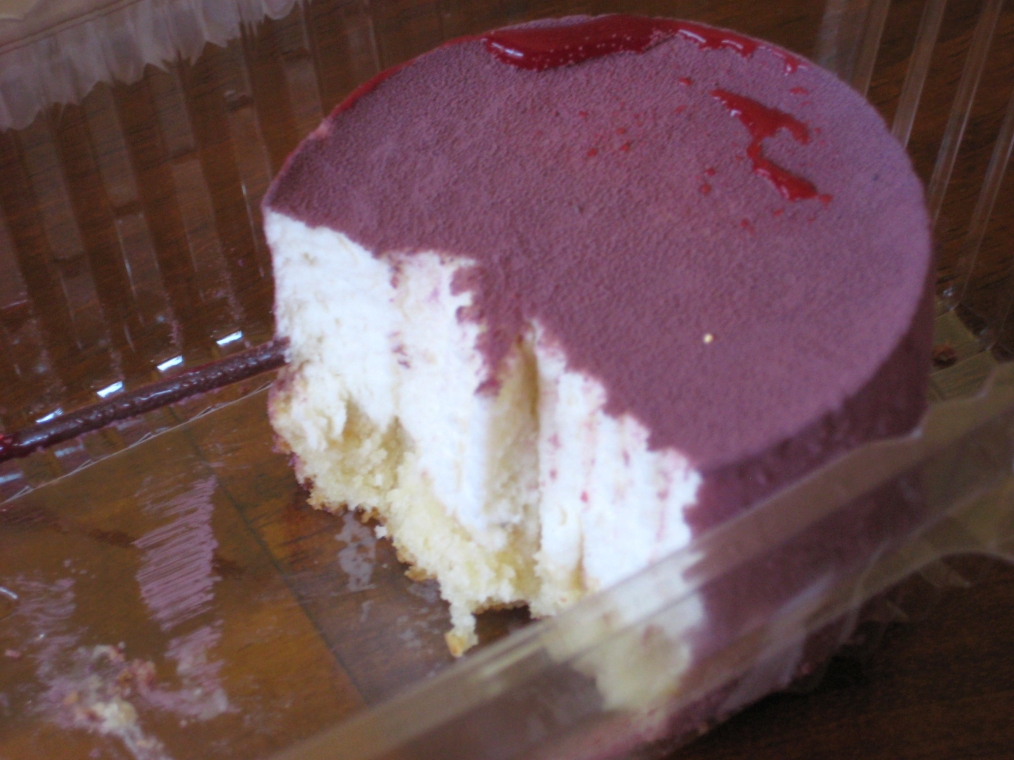
And so a mousse it is! For the base of this entremet I used a simple vanilla and almond cake, then made a mousse using both chamomile and lemon verbena teas, sprayed it with colored cocoa butter, and topped it with some raspberry coulis, gold leaf, and chocolate decor.

Image

The mousse is luscious and creamy, with the same citrus flavours presented in the teas, while the cake provides a pleasant subtle sweetness along with it. The raspberry coulis provides the entremet with a nice pop of flavour as well.

Image

When it was done, I excitedly brought one to my fiance’s home, where it was devoured in seconds. By him. Or me. Okay, mostly me. Oh yeah, and he liked it too!

Chamomile and Lemon Verbena Entremet

makes 6 (7cm) entremets

For vanilla/almond cake:

82 g butter

50 g sugar

6 g vanilla extract

50 g egg

40 g cake flour

1 g salt

6 g baking powder

38 g almond flour

Preheat oven to 350F. In a bowl of a stand mixer fitted with a paddle attachment, cream together butter and sugar until pale. Switch paddle to whisk attachment, then add vanilla extract and egg, and whisk on medium speed until incorporated.

Sift together cake flour, salt, baking powder, and almond flour. Slowly add dry ingredients to batter, then mix just until combined. divide batter between 6 (7cm) ring molds on a lined sheet pan, piping batter 1/6th of the way up the sides of the molds and then lightly tapping sheet pan on counter to flatten tops of cakes. Bake 7-9 minutes or until cakes are fully cooked. Chill before making mousse.

For Chamomile and Lemon Verbena Mousse:

105 g milk

4 g Chamomile Citron tea, loose leaf

3 g lemon verbena tea, loose leaf

25 g water

5 g gelatin, powdered

185 g heavy cream

26 g egg yolks

35 g sugar

In a small sauce pot, combine milk, chamomile leaves, and lemon verbena leaves and bring to a simmer. Turn off heat, cover pot, and let steep 10-15 minutes.

Whip heavy cream to a soft peak, then set aside.

Mix together gelatin and water until there are no lumps, and let bloom 5 minutes. Using a fine mesh sieve, strain leaves from milk, squeezing out any extra milk the leaves have absorbed. Discard leaves. Heat milk over low heat again, and mix together yolks and sugar. Whisk yolks into heated milk, then gently heat until milk thickens and eggs cook lightly(basically make an anglaise). Add gelatin, and heat until gelatin has melted. Let mixture cool slightly, then gently fold into whipped cream until everything is combined. Divide mousse between each ring mold, then refrigerate and then freeze until set and ready to unmold.

Standard
Breakfast, Cake, Chocolate, Recipes

Rocky Road Muffins

Image

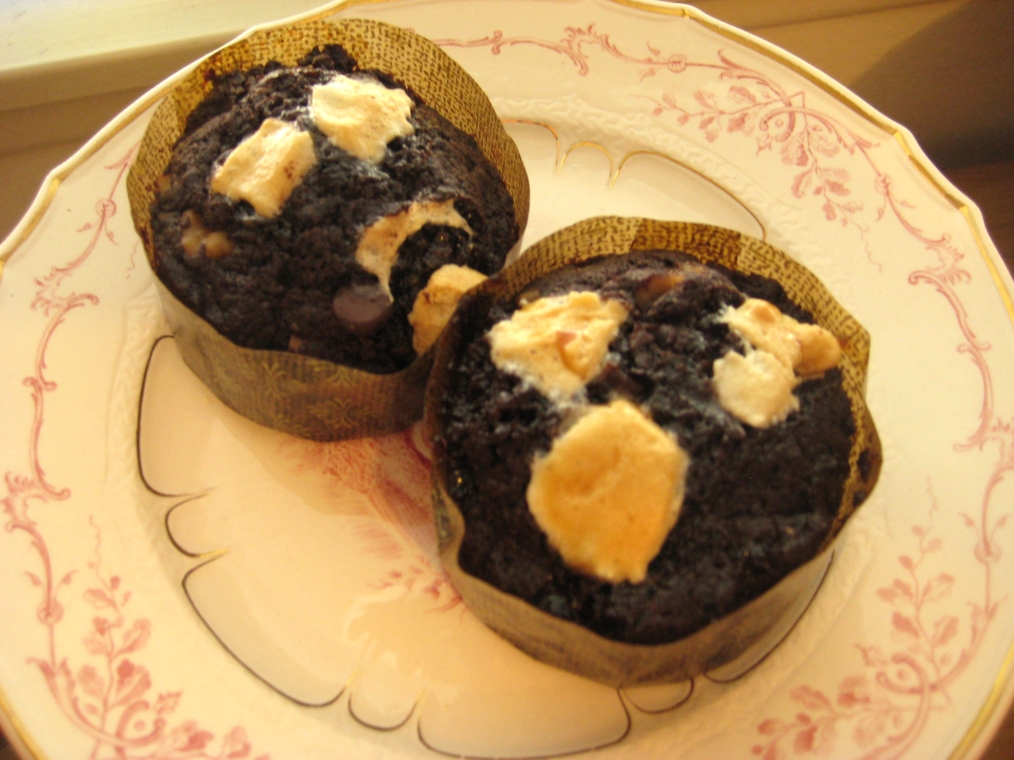
One of the breakfast items we sell at work is Rocky Road muffins, a take on the American ice cream flavour by the same name; chocolate ice cream loaded with chunks of walnuts and frozen marshmallow. Obviously, I was intrigued by the concept. For the last few days I”ve been sick with a nasty cold (and still am, unfortunately), and honestly at that point anything with chocolate sounded amazing.

Image

Anyway, long story short, it was amazeballs. It was rich, intensely chocolatey, and just what I needed to forget about my cold for a few dreamy seconds (sigh). I concluded that I needed to make this stuff for myself, so here’s my own recipe for these babies. If you do decide to try it out, just make sure you have someone else to share these guys with or risk eating them all yourself and feeling guilty afterward. I promise I won’t tell anyone, though…

Rocky Road Muffins

Makes 8 muffins

145 g All Purpose flour

75 g dark cocoa powder

2 g salt

6 g baking powder

180 g sugar

100 g eggs (2 large)

135 g vegetable or canola oil

75 g buttermilk

3 g vanilla extract

76 g semi-sweet chocolate chips

35 g walnuts, chopped

35 g mini marshmallows, plus more for garnish

Preheat oven to 350F. In a bowl of a stand mixer, whisk together flour, cocoa powder, salt, baking powder, and sugar until there are no lumps. In another bowl whisk together eggs, oil, buttermilk, and vanilla extract. With mixer running on low, slowly stream inĀ  wet ingredients into dry ingredients. Mix just until everything is combined.

With a rubber spatula, fold in chocolate chips, walnuts, and mini marshmallows until combined. Divide batter between lined muffin molds, filling molds 3/4 full. Top each muffin with 3 or 4 mini marshmallows. Bake 350F for 20-22 minutes, then let cool completely in pans before removing and storing.

Standard
Cake, Chocolate

Another Happy Birthday and a Crepe Cake

Image

2 days ago was my cousin’s 27th birthday, and she requested the same cake I made her last year: a nutella crepe cake.

Image

Unfortunately, I don’t have a cross-section photo of the cake, but it’s 25 paper-thin crepes layered with nutella filling and enrobed in white chocolate chantilly. Needless to say, I was very pleased with the outcome, and the cake also managed to last the 2-hour drive in the humid 95 degree weather, which I was also very pleased with!

Standard